

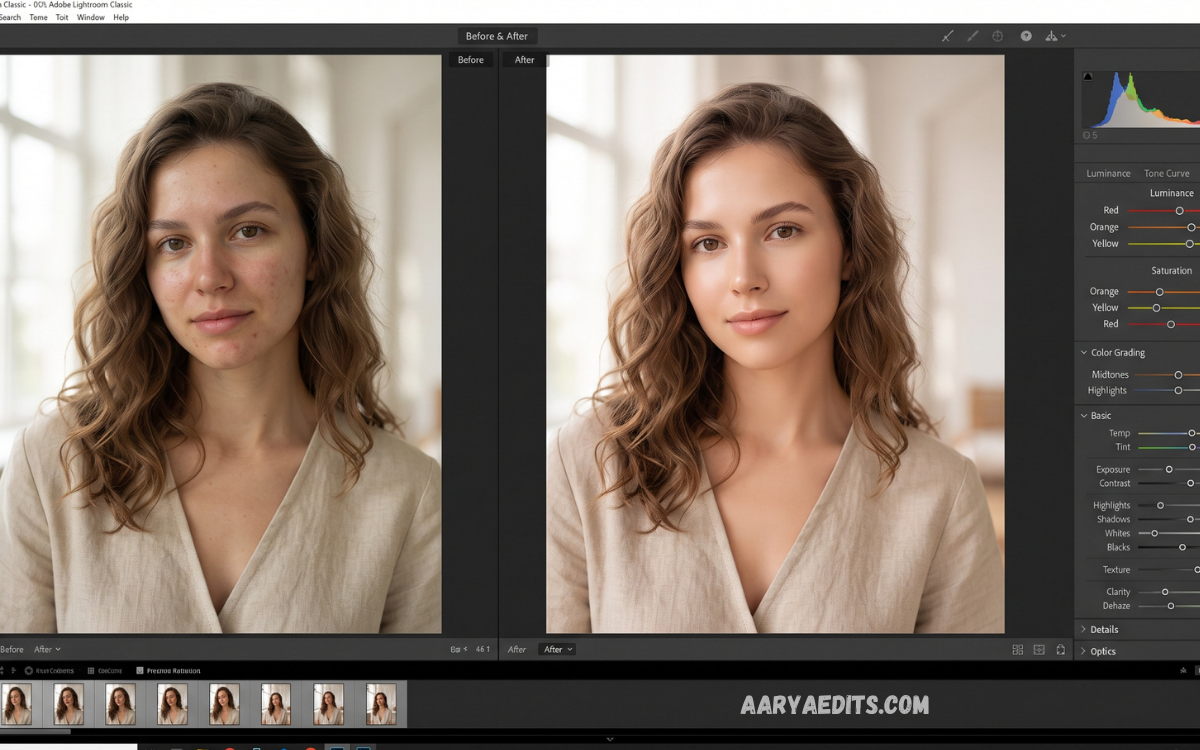
Lightroom skin tone editing is an essential portrait photography skill that helps photographers create natural, balanced, and professional-looking skin colors. A well-edited portrait should preserve realistic complexion, subtle texture, natural highlights, and accurate color variation without making the subject appear artificial.
Professional Lightroom Skin Tone Editing focuses on correction rather than excessive transformation. The objective is not to remove every variation from the skin but to create a consistent visual appearance while maintaining realistic texture and dimensionality.
Why Lightroom Skin Tone Editing Matters
Skin tone strongly influences how viewers perceive a portrait. Even excellent photography can appear unprofessional when skin becomes overly orange, excessively red, unnaturally pale, or too saturated. Lightroom allows photographers to control these issues through precise adjustments instead of relying on aggressive presets or filters. A balanced complexion can make an image look cleaner while maintaining the original character of the subject.
Another important advantage involves consistency. Portrait sessions frequently contain different lighting conditions, camera angles, backgrounds, and exposure levels. Lightroom Skin Tone Editing helps create visual consistency across an entire collection. Photographers can develop a reliable editing process, synchronize selected adjustments, and refine individual portraits with masking tools when lighting changes between images.
Understanding Natural Skin Color
Natural skin does not contain a single universal color. Skin complexion varies according to genetics, lighting, camera settings, environment, white balance, and exposure. Even within one portrait, shadows can appear cooler while highlights appear warmer. Understanding this variation prevents photographers from applying one fixed HSL value to every image.
A professional editor looks for believable color relationships instead of chasing a specific numerical setting. Healthy-looking skin generally maintains balanced warmth without excessive saturation. The goal should be visual accuracy under the photograph’s lighting conditions. Lightroom Skin Tone Editing becomes more effective when adjustments are based on the actual image rather than a preset formula.
Start With White Balance
White Balance should normally be corrected before making detailed skin adjustments. Temperature controls the overall relationship between warm and cool tones, while Tint affects the green-magenta balance. Incorrect white balance can make skin appear excessively yellow, orange, blue, green, or magenta even when HSL values are technically reasonable.
Begin by examining neutral areas within the photograph, such as white clothing, gray surfaces, or neutral backgrounds. Adjust Temperature and Tint until the overall scene appears believable. After establishing a suitable white balance, inspect the subject’s complexion. This foundation makes subsequent Lightroom Skin Tone Editing significantly more predictable and reduces the need for extreme color corrections.
Correct Exposure Before Color
Exposure affects perceived skin color more than many beginners realize. Underexposed skin can appear muddy, saturated, or excessively red, while overexposed skin can lose texture and look washed out. Before changing individual colors, establish a balanced tonal foundation using Exposure, Contrast, Highlights, Shadows, Whites, and Blacks.
The objective is to retain important detail across the face. Highlights should preserve information around the forehead, cheeks, nose, and other bright areas. Shadows should retain natural dimensionality without becoming gray or excessively dark. Once exposure is balanced, skin color becomes easier to evaluate accurately.
Use the HSL Color Mixer
The HSL Color Mixer is one of the most useful tools for Lightroom Skin Tone Editing. HSL represents Hue, Saturation, and Luminance, allowing photographers to target individual color families. Skin commonly contains combinations of red, orange, yellow, and sometimes subtle magenta tones.
Orange is especially important because many complexions contain significant orange information. Small adjustments to Orange Hue can shift the character of the skin, while Orange Saturation controls color intensity and Orange Luminance affects perceived brightness. Red and Yellow controls can also influence facial color, but they should be adjusted carefully because aggressive changes can quickly produce unrealistic results.
Adjust Orange Hue Carefully
Orange Hue can significantly change the appearance of skin. Moving the Hue slider toward yellow may create a warmer complexion, while moving it toward red can produce a deeper or rosier appearance. Neither direction is automatically correct because the appropriate adjustment depends on the original lighting and camera profile.
Use small changes rather than dramatic movements. A professional Lightroom Skin Tone Editing workflow usually benefits from subtle color shifts that remain difficult to detect individually. After adjusting Orange Hue, zoom out and examine the complete portrait. Skin should still look natural when viewed at normal image size.
Control Orange Saturation
Excessive Orange Saturation is a common issue in portrait editing. Increasing saturation may initially make skin appear vibrant, but stronger values can quickly create an artificial orange appearance. This problem becomes particularly noticeable in warm indoor lighting, golden-hour photography, and images edited with strong presets.
Instead of automatically increasing saturation, determine whether the original skin is already sufficiently colorful. In many portraits, slightly reducing Orange Saturation yields a more refined, realistic result. If the skin looks dull after reduction, restore a small amount rather than applying a large increase. Professional results usually come from controlled saturation rather than maximum color intensity.
Improve Skin Brightness With Luminance
Orange Luminance is another important control for portrait editing. Increasing luminance can brighten skin and create a softer appearance, while reducing luminance can produce deeper and more dramatic complexion tones. Excessive luminance, however, can flatten facial structure and remove natural depth.
Use luminance alongside exposure and local masking rather than relying on it as the only brightness control. A small increase may help the face stand out from the background, while carefully controlled highlights preserve dimensionality. Always compare the edited image with the original to ensure that the adjustment improves the photograph rather than simply making the skin brighter.
Use Masking for Precise Skin Adjustments
Lightroom’s Masking tools provide greater precision than global HSL adjustments. Select Subject, People masks, Color Range, and Brush tools can isolate areas of the portrait so that corrections affect the intended regions. This approach is particularly useful when the background contains similar colors to the subject’s skin.
A People mask can help target facial skin, body skin, or specific facial areas depending on the available selection options. After creating a mask, adjust exposure, temperature, tint, saturation, or texture selectively. Masking is especially valuable when different areas of the subject require different corrections.
Refine Skin With Color Range
Color Range masking can target specific colors within an image. This technique is useful when skin has an identifiable color cast that needs selective correction. By sampling the problematic area, photographers can isolate similar tones and make controlled adjustments without heavily affecting clothing, hair, or the background.
Color Range should still be reviewed carefully because skin can overlap with background objects containing similar hues. Use the mask overlay to determine exactly where the adjustment applies. Refining the mask can prevent unintended changes and produce a more controlled Lightroom Skin Tone Editing result.
Correct Redness in Skin
Redness can appear naturally around cheeks, nose, ears, and areas affected by lighting or skin characteristics. Camera profiles, warm light, high ISO, and strong contrast can increase the appearance of red tones. Removing all redness is rarely desirable because natural complexion contains variation.
Instead, target excessive red areas selectively. Red Hue, Saturation, and Luminance adjustments can help, while a local mask allows more precise control. Reduce intensity gradually and compare the corrected area with neighboring skin. The final result should retain natural facial variation rather than creating a uniform surface.
Handle Yellow Skin Carefully
Yellow or green skin can result from fluorescent lighting, mixed light sources, environmental reflections, or inaccurate white balance. HSL adjustments can help correct these color casts, but global changes may also affect clothing, plants, backgrounds, and other objects.
When the unwanted yellow or green cast affects only the subject, masking provides a safer solution. Adjust Temperature and Tint inside the mask before making stronger HSL corrections. This method often produces more natural results because it addresses the lighting relationship instead of simply changing one color channel.
Manage Skin Texture Professionally
Skin texture is a major component of realistic portrait editing. Excessive texture reduction can create plastic-looking skin, while excessive sharpening can emphasize pores and imperfections. Lightroom provides Texture, Clarity, and local adjustment controls that should be used with restraint.
For polished portraits, reducing Texture slightly can soften harsh detail while retaining important facial characteristics. Clarity should generally remain controlled because strong negative Clarity can produce an artificial glow. The best results maintain recognizable texture, natural pores, and realistic facial structure.
Use the Healing Tool for Distractions
Healing tools can remove temporary distractions such as small blemishes, dust marks, stray spots, or other short-term imperfections. The objective should be refinement rather than changing permanent facial characteristics. Overusing healing tools can make portraits look unrealistic and remove details that contribute to individuality.
Work at an appropriate zoom level while editing, then return to the full image frequently. A blemish that appears significant at 200% may be almost invisible in the final photograph. Professional retouching considers the final viewing size instead of attempting to create an unnaturally perfect surface.
Avoid Excessive Skin Smoothing
One of the most common portrait editing mistakes is excessive skin smoothing. Strong Texture and Clarity reductions can remove pores and fine facial details, creating a synthetic appearance. This effect becomes especially obvious when the face is compared with hair, eyes, lips, and clothing that retain sharp detail.
Use selective adjustments rather than applying heavy smoothing across the entire portrait. If skin requires softness, apply a subtle mask to relevant areas while protecting eyes, eyebrows, lips, nostrils, hair, and facial contours. Natural texture is an important element of professional Lightroom Skin Tone Editing.
Brighten the Face Selectively
A subtle local exposure adjustment can improve facial presence without changing the entire photograph. Use a face or subject mask and increase exposure slightly when the face appears darker than intended. Keep the adjustment restrained so that the face remains integrated with the surrounding light.
Highlights and shadows can also be refined within the mask. Brightening midtones while controlling highlights often produces a more natural result than simply increasing global exposure. This technique helps maintain facial dimension while giving the subject greater visual prominence.
Preserve Facial Dimension
Portraits depend on light and shadow to communicate depth. Flattening every shadow can make the face appear two-dimensional. Professional Lightroom Skin Tone Editing should therefore preserve natural shading around the cheeks, jawline, nose, and other facial structures.
Instead of removing all tonal variation, identify whether each shadow belongs to the lighting design. If it contributes to facial shape, preserve it. If it creates an unwanted color cast or excessive darkness, correct it locally. This approach maintains realism while improving overall polish.
Edit Eyes Without Overprocessing
Eyes naturally attract attention, but excessive editing can make them look artificial. Slightly increasing exposure, texture, or sharpness can improve clarity, while excessive brightness or saturation can create an unnatural appearance.
Use a dedicated eye mask when necessary. Keep whites of the eyes neutral without making them completely white, and avoid excessive sharpening around the iris. The eyes should appear healthy and detailed while remaining consistent with the lighting of the portrait.
Balance Lips and Other Facial Colors
Lips can sometimes be affected by skin-tone corrections because red and orange channels overlap with facial color. If global adjustments make lips too pale or overly saturated, use a local mask to restore their natural appearance.
A balanced portrait maintains separation between skin, lips, eyes, hair, and clothing. Local masking makes it possible to correct these areas independently. This level of control becomes increasingly important in close-up portraits and professional beauty photography.
Use Camera Profiles as a Foundation
Camera Profiles influence color rendering before many Lightroom adjustments are applied. Different profiles can produce noticeably different skin characteristics, contrast levels, and color relationships. Choosing an appropriate profile can therefore reduce the amount of correction required later.
Test a few suitable profiles while viewing the subject’s complexion carefully. Select the option that produces a believable foundation rather than simply choosing the most dramatic appearance. A natural profile can make Lightroom Skin Tone Editing easier and more consistent across a portrait collection.
Create a Consistent Editing Workflow
A repeatable workflow helps photographers achieve consistent results across multiple images. Begin with profile selection, white balance, exposure, contrast, and tonal corrections. Continue with global color adjustments, HSL refinement, masking, skin correction, texture refinement, and final detail work.
The order can vary depending on the photograph, but consistency matters more than following a rigid sequence. Save useful settings as presets when appropriate, then refine each portrait individually. A preset should provide a starting point rather than replace professional judgment.
Use Presets Without Losing Control
Lightroom presets can speed up editing, particularly for large portrait sessions. However, a preset designed for one lighting environment may produce poor skin tones under different conditions. Temperature, exposure, camera profile, and ambient lighting can vary significantly from one session to another.
After applying a preset, inspect skin immediately. Correct white balance and exposure before assuming the preset is suitable. A professional workflow uses presets for efficiency while preserving manual control over critical elements such as complexion, facial brightness, and local color.
Lightroom Skin Tone Editing for Indoor Portraits
Indoor portraits often contain mixed artificial lighting that can introduce yellow, green, or orange color casts. Different bulbs may illuminate different parts of the face, creating inconsistent complexion colors within the same photograph.
Begin by correcting the overall white balance, then use masking to handle localized color differences. Temperature and tint adjustments can help restore neutral skin tones, while HSL controls can refine any remaining color problems. Avoid making strong global changes when only one section of the face requires correction.
Lightroom Skin Tone Editing for Outdoor Portraits
Outdoor portraits can change dramatically depending on sunlight, shade, clouds, and reflected environmental color. Direct sunlight may produce strong highlights, while shade can create cooler skin tones. Green surroundings may also reflect color onto the subject.
Use white balance and exposure as the foundation, then evaluate skin under natural viewing conditions. A subtle temperature adjustment can restore warmth, while selective masks can correct areas affected by environmental reflections. Preserve natural sunlight and avoid making outdoor portraits look artificially neutral.
Lightroom Skin Tone Editing for Golden Hour
Golden-hour light naturally produces warm skin tones. This warmth can be attractive, but excessive editing may turn the complexion orange or yellow. The goal is to preserve the atmosphere while preventing color from becoming overwhelming.
Instead of neutralizing the entire image, make small adjustments to temperature and orange saturation. Protect warm highlights and maintain realistic shadow color. Golden-hour portraits should feel warm because of the light, not because of excessive saturation.
Lightroom Skin Tone Editing for Darker Complexions
Editing darker skin tones requires careful attention to exposure, highlights, color, and contrast. Raising exposure excessively can flatten complexion depth, while aggressive shadow lifting can remove dimensionality. Skin color should remain rich and natural while retaining highlight detail.
Use targeted masks to enhance facial brightness without altering the complexion’s character. Pay close attention to red, orange, and yellow relationships, because these channels can respond differently depending on lighting and camera profile. Professional editing respects the natural depth and color variation of every complexion.
Lightroom Skin Tone Editing for Fair Complexions
Fair skin can be particularly sensitive to excessive exposure, redness, and saturation adjustments. Strong highlights may remove subtle detail, while increased warmth can quickly create an orange appearance.
Use restrained exposure and highlight adjustments, then evaluate red and orange saturation carefully. Local corrections can help reduce isolated redness without changing the entire complexion. Preserving delicate tonal transitions is more important than making skin uniformly bright.
Check Skin Tones With the Histogram
The histogram provides useful information about overall tonal distribution. It does not directly determine whether skin is correct, but it can reveal clipped highlights, crushed shadows, and exposure problems that influence complexion appearance.
Use the histogram together with visual inspection. A technically balanced histogram does not guarantee attractive skin tones, and a portrait can intentionally contain strong highlights or shadows. Professional Lightroom Skin Tone Editing combines technical information with visual judgment.
Compare Before and After
Before-and-after comparisons are essential during portrait editing. Lightroom allows photographers to review the original and edited versions, making it easier to identify adjustments that have become excessive over time.
Regular comparisons prevent gradual overediting. If the edited portrait looks dramatically different from the original complexion without a clear creative reason, reduce the intensity. The strongest professional edits often look subtle because they improve the photograph without announcing the editing process.
Zoom In and Zoom Out
Editing at a single zoom level can create inaccurate decisions. Zooming in helps evaluate pores, blemishes, sharpness, and localized color problems. Zooming out shows whether the portrait works as a complete visual composition.
Switch between both views throughout the process. A skin correction that looks excellent at high magnification may appear strange at normal viewing size. Conversely, a subtle color issue may be difficult to identify when zoomed out. Professional editors continually evaluate both detail and overall appearance.
Common Lightroom Skin Tone Editing Mistakes
Over-saturation is one of the most frequent problems. Increasing orange and red saturation may make skin appear vibrant on the editing screen, but the final image can look unnatural. Another common mistake is excessive smoothing, which removes texture and makes the face appear artificial.
Other problems include incorrect white balance, excessive exposure, overly bright eyes, aggressive clarity reduction, and inconsistent skin color between photographs. Avoiding these mistakes requires a controlled workflow and frequent comparison with the original image.
Avoid One-Click Skin Presets.
One-click presets can be useful starting points, but they cannot understand the unique lighting conditions of every portrait. A preset created for warm outdoor photography may produce poor results on an indoor image with green artificial lighting.
Use presets as a foundation, then customize the settings. White balance, exposure, HSL, masking, and local corrections should be adjusted according to the specific photograph. This approach combines speed with professional control.
Develop Your Own Skin Tone Preset
Once you understand your preferred editing style, you can create a custom preset containing useful baseline adjustments. Include only settings that remain consistent across different images. Avoid locking exposure and white balance into a general portrait preset because those values often change from photograph to photograph.
A useful preset may contain subtle color profile, HSL, texture, and tonal settings. Apply it to new images, then refine the individual portrait. Over time, this workflow can significantly reduce editing time while maintaining consistent results.
Maintain Natural Skin Texture
Natural texture is one of the strongest indicators of authentic portrait editing. Pores, fine lines, subtle shadows, and small variations help communicate realistic skin. Removing every imperfection can create a polished but artificial appearance.
Professional Lightroom Skin Tone Editing should therefore improve texture rather than eliminate it. Reduce distracting detail selectively, retain important facial structure, and ensure that the final portrait still resembles a real person under real lighting.
Match Skin Across Multiple Photos
Consistency becomes challenging when editing a complete portrait session. Different angles may receive different levels of light, causing one photograph to look warmer or darker than another. Applying identical settings does not always solve the problem.
Use synchronization for broad adjustments, then inspect each image individually. Compare skin tones across the sequence and make small local corrections where necessary. Consistent complexion is particularly important for wedding albums, fashion campaigns, family sessions, and professional portfolios.
Export Portraits With Appropriate Settings
After completing Lightroom Skin Tone Editing, export settings can influence the final appearance. For web use, choose a suitable color space and resolution based on the destination platform. For print, follow the requirements of the printing service or laboratory.
Always review exported files when color accuracy matters. An image can appear different across displays, applications, and devices. Maintaining a controlled color workflow from editing through export helps preserve the intended appearance.
Read Also: Professional Lightroom Background Blur Techniques for Stunning Photos
Professional Workflow for Lightroom Skin Tone Editing
A reliable workflow can be summarized as a sequence of controlled decisions. Start by selecting an appropriate profile, correcting white balance, establishing exposure, balancing contrast, and refining global color. Next, inspect skin with HSL controls and create masks for areas requiring localized correction.
Continue with texture refinement, blemish cleanup, eye adjustments, and final color balancing. Finish by comparing the edited portrait with the original and checking the image at multiple zoom levels. This workflow reduces unnecessary adjustments and keeps the final portrait realistic.
Advanced Color Grading for Portraits
Color Grading can add a creative finishing layer after skin tones are corrected. Shadows, midtones, and highlights can receive subtle color influences that shape the photograph’s mood. However, skin should remain protected from unwanted color contamination.
For example, a warm highlight treatment can complement a portrait while cool shadows create separation. Keep the effect subtle and evaluate the subject’s complexion after every change. Creative grading should enhance the atmosphere without compromising realistic skin color.
Use Local Temperature Adjustments
Local temperature adjustments are highly effective when skin is unevenly lit. A face illuminated by a warm lamp may need different treatment from another section illuminated by daylight. Global temperature cannot solve every mixed-light problem without affecting the rest of the image.
Create a mask around the affected area and make a small local temperature adjustment. Combine it with tint when necessary. This technique can produce a more cohesive complexion while preserving the surrounding environment.
Professional Tips for Better Results
Work with a calibrated or reasonably accurate display whenever possible. Display inaccuracies can make skin appear warmer, cooler, brighter, or darker than it actually is. Consistent viewing conditions help improve editing decisions.
Avoid editing while fatigued or staring at the same image for too long. Color perception can change during extended sessions. Take short breaks and return with fresh eyes. Professional consistency depends not only on Lightroom’s tools but also on disciplined visual evaluation.
How to Make Skin Look Natural in Lightroom
Natural skin requires balance between color, brightness, contrast, and texture. No single slider creates a realistic complexion. Instead, combine subtle adjustments while preserving the portrait’s original lighting characteristics.
Start with white balance and exposure, then refine HSL values and local masks. Reduce unwanted color rather than aggressively adding preferred colors. Preserve texture and facial shadows. The final portrait should look polished without appearing heavily edited.
How to Make Skin Look Smooth Without Losing Detail
Smooth skin can be achieved through selective texture reduction, careful control of Clarity, and targeted healing. Apply these corrections only where necessary and avoid affecting eyes, lips, hair, eyebrows, and important facial contours.
The most convincing result retains pores and natural tonal transitions. If the skin appears blurred when viewed at normal size, reduce the smoothing strength. Professional retouching is usually less aggressive than beginner editing because subtle corrections preserve realism.
How to Fix Orange Skin in Lightroom
Orange skin usually results from excessive warmth, saturation, or a combination of both. Begin by checking White Balance and reducing unnecessary temperature. Then inspect Orange Saturation and Luminance in the Color Mixer.
If only the subject is orange while the background looks correct, create a People or Color Range mask. Apply the correction locally instead of changing the entire photograph. This approach preserves the original atmosphere while bringing the complexion closer to a natural appearance.
How to Fix Red Skin in Lightroom
Red skin can be corrected by evaluating both white balance and the red and orange color channels. Avoid immediately reducing red saturation globally, as it can remove important colors from clothing, lips, and background elements.
Use a selective mask when redness is localized. Lower saturation gently and adjust luminance if necessary. The result should retain natural warmth and facial variation rather than creating a gray or lifeless skin tone.
How to Fix Yellow Skin in Lightroom
Yellow skin may indicate warm lighting or an unwanted yellow cast. Check temperature first because correcting the overall white balance can resolve the problem without requiring aggressive HSL changes.
If yellow remains in specific areas, use a mask and refine the temperature, tint, or saturation of yellow. Make gradual changes and compare the result with neutral areas of the image. The goal is believable color rather than complete removal of warmth.
How to Fix Green Skin in Lightroom
Green skin often appears under certain artificial lights or through reflections from vegetation and colored surroundings. Tint adjustment can help restore the magenta-green balance, while local masking provides greater control.
Avoid pushing Tint too far, as excessive magenta can create an unnatural color cast. Correct the underlying lighting relationship first, then refine the remaining green tones with selective color controls.
Lightroom Skin Tone Editing for Professional Photography
Professional portrait photography demands consistency, realism, and efficient processing. Lightroom provides a complete environment for organizing, correcting, masking, color grading, and exporting large collections of photographs.
The strongest results come from combining global corrections with local adjustments. Global settings establish the visual foundation, while masks handle individual complexion problems. This balance allows photographers to process images efficiently without sacrificing quality.
Final Checklist for Skin Tone Editing
Before exporting a portrait, inspect white balance, exposure, skin saturation, facial brightness, texture, redness, and color consistency. Check whether the skin remains believable compared with the original photograph and whether the subject still retains natural facial characteristics.
Review the portrait at normal viewing size and high magnification. Examine the eyes, lips, hairline, cheeks, nose, forehead, and jawline for unwanted artifacts. Finally, compare several images from the same session to ensure consistent skin appearance across the complete collection.
Frequently Asked Questions
What is Lightroom Skin Tone Editing?
Lightroom skin tone editing is the process of correcting and enhancing skin color, brightness, saturation, and texture in portraits. It helps create natural-looking complexions while preserving realistic facial details and lighting.
How do I get natural skin tones in Lightroom?
Start by correcting white balance and exposure before adjusting skin colors. Then use the Color Mixer, HSL controls, and selective masking to make subtle changes to red, orange, and yellow tones.
Which Lightroom tool is best for skin tones?
The Color Mixer is one of the most useful tools for skin tone adjustments. Masking is also essential because it allows you to apply color, exposure, temperature, and texture corrections specifically to the skin.
How do I fix orange skin in Lightroom?
Check White Balance first and reduce excessive warmth if necessary. Then slightly reduce Orange Saturation or adjust orange hue and luminance until the complexion looks natural.
How do I fix red skin in Lightroom?
Use the red and orange controls in the color mixer to reduce excessive redness. For localized redness, create a mask and make a subtle saturation or color adjustment instead of changing the entire photograph.
How do I smooth skin in Lightroom without making it look fake?
Use a subtle reduction in texture and clarity with a selective skin mask. Avoid excessive smoothing because retaining pores, fine details, and natural facial texture creates a more realistic portrait.
Can Lightroom edit different skin tones professionally?
Yes. Lightroom can be used professionally for a wide range of complexions. The key is to evaluate each photograph individually and adjust exposure, white balance, color, and contrast according to the lighting and natural characteristics of the subject.
Should I use presets for Lightroom Skin Tone Editing?
Presets can provide a useful starting point, especially when editing large portrait collections. However, exposure, white balance, and skin color should still be refined individually because lighting conditions vary between photographs.
How can I make skin brighter in Lightroom?
Use a selective people or subject mask and make a small exposure or luminance adjustment. Preserve facial shadows and highlights so the skin remains dimensional rather than appearing flat or overexposed.
What is the biggest mistake in Lightroom skin tone editing?
Overediting is one of the biggest mistakes. Excessive saturation, smoothing, brightness, or color correction can make skin appear artificial. Professional results usually come from subtle adjustments that improve the portrait while preserving natural texture and color
Conclusion
Lightroom Skin Tone Editing is less about finding a perfect slider value and more about developing a controlled color-correction workflow. White balance, exposure, HSL, masking, texture, healing, and color grading each play a specific role in creating professional portrait results.
The most effective approach is subtle and image-specific. Avoid excessive saturation, aggressive smoothing, unrealistic brightness, and one-click corrections that ignore lighting conditions.
