

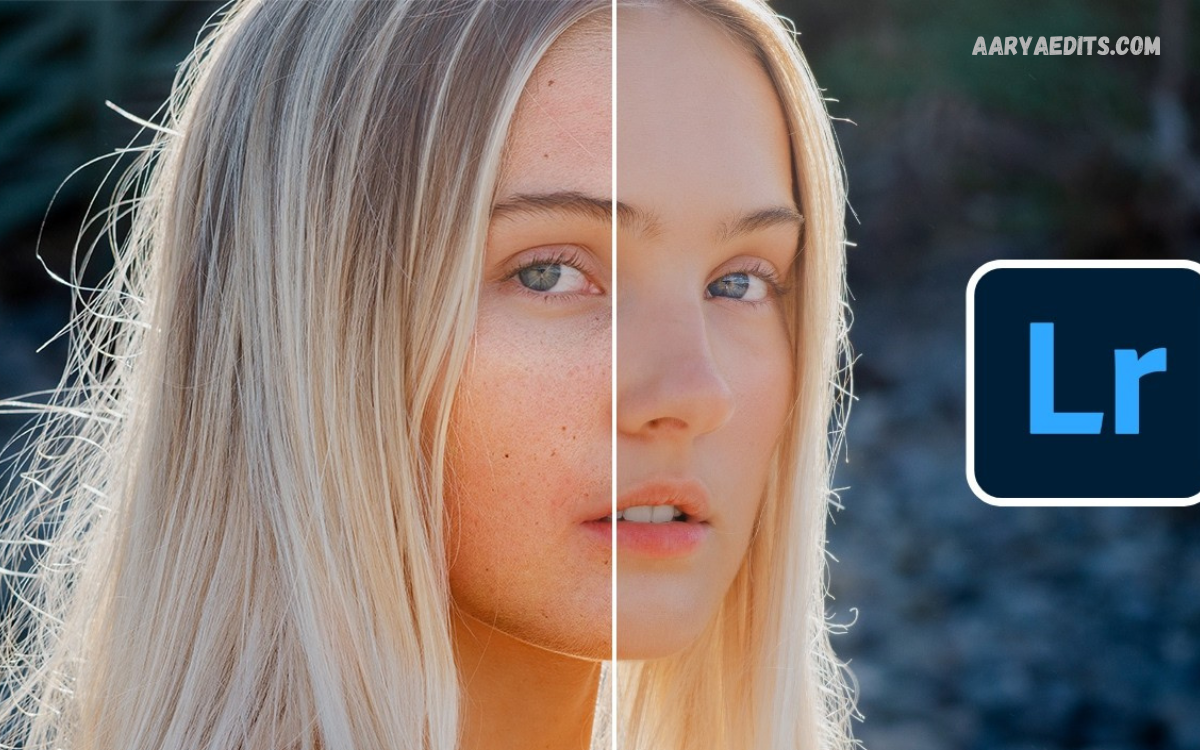
Professional Lightroom face retouching is a powerful approach for improving portrait photographs while preserving realistic facial details, natural skin texture, and authentic expressions. Adobe Lightroom provides professional tools for correcting exposure, reducing distractions, refining skin appearance, and creating polished portraits without making the subject look artificial.
Modern portrait photography requires more than simply increasing exposure or applying a preset. Professional retouching involves understanding light, color, texture, contrast, sharpness, and facial characteristics.
What Is Professional Lightroom Face Retouching?
Professional Lightroom face retouching refers to the process of enhancing facial photographs through Lightroom’s editing tools while maintaining a realistic appearance. Unlike aggressive beauty editing, professional retouching aims to correct temporary imperfections, improve tonal balance, refine skin color, and emphasize important facial features without removing the person’s natural identity.
The technique combines global adjustments with targeted corrections. Exposure, white balance, highlights, shadows, contrast, texture, clarity, color, and sharpening can establish the foundation of a portrait. Masking tools can then isolate the face, skin, eyes, lips, hair, or background for controlled adjustments, creating a polished result without affecting unrelated areas of the image.
Why Natural Retouching Matters
Natural retouching has become increasingly important because viewers recognize unrealistic skin and excessive facial manipulation immediately. Completely removing pores, wrinkles, facial contours, or natural texture can make an image appear artificial. Professional editing should improve the photograph while allowing the subject to remain recognizable and authentic.
A refined portrait normally requires small adjustments rather than dramatic changes. Slight texture reduction, balanced exposure, controlled highlights, accurate skin color, and selective sharpening can produce a major improvement. The objective is not to create a different person but to present the existing subject under the most flattering visual conditions.
Preparing Your Portrait Before Retouching
Before beginning Professional Lightroom Face Retouching, import the highest-quality original file available. RAW files provide significantly more flexibility for exposure, color, highlight recovery, shadow recovery, and white-balance adjustments than heavily compressed images. Proper preparation gives every later adjustment a stronger foundation.
Begin by evaluating the photograph at both fit-screen and zoomed views. Check facial lighting, skin color, distracting objects, background brightness, sharpness, and overall composition. Avoid immediately applying strong effects. Understanding the photograph first helps determine which areas actually require correction and prevents unnecessary editing.
Correcting White Balance for Better Skin Color
White balance has a major influence on facial appearance. A portrait with excessive warmth can make skin look orange or yellow, while excessive coolness can create pale, gray, or bluish skin. Lightroom’s Temperature and Tint controls allow photographers to establish a more accurate color foundation before performing detailed retouching.
Use recognizable neutral areas within the photograph when possible, but always evaluate the skin visually. Skin tones vary naturally according to lighting conditions, ethnicity, environment, camera settings, and individual characteristics. A technically neutral white balance does not always produce the most flattering portrait, so professional judgment remains essential.
Improving Exposure Before Face Retouching
Exposure should normally be corrected before detailed facial editing. If the face is too dark, increasing skin brightness later may produce unnecessary noise or unnatural color. If the face is overexposed, skin highlights may lose important detail that cannot be recovered completely.
Use Lightroom’s Exposure, Highlights, Shadows, Whites, and Blacks controls carefully. The face should remain visually prominent without appearing brighter than the surrounding environment. Professional portrait editing usually benefits from balanced tonal separation rather than extreme brightness.
Using Lightroom Masking for Facial Editing
Lightroom’s Masking system is one of the most valuable tools for Professional Lightroom Face Retouching. Subject selection, people selection, brush masks, linear gradients, radial gradients, and color-based selections allow photographers to apply adjustments to specific portions of a photograph.
For portraits, People masking can help identify facial regions, hair, skin, lips, eyes, and other areas depending on the Lightroom version and image structure. Manual brush adjustments remain valuable when automated selections require refinement. Always inspect mask edges at high magnification to prevent visible transitions around the face.
Smoothing Skin Without Removing Texture
Skin smoothing is one of the most frequently misunderstood aspects of portrait retouching. Excessive smoothing removes pores and fine details, producing a plastic appearance. Professional editing should reduce distracting temporary imperfections while retaining enough texture to make the skin appear real.
Lightroom’s Texture adjustment can help create softer skin when applied selectively through a mask. Reduce Texture moderately and evaluate the result at normal viewing size. Avoid applying heavy negative Clarity or excessive noise reduction to the entire face because these adjustments can destroy important facial detail.
Reducing Temporary Blemishes
Temporary blemishes, small marks, dust spots, and isolated distractions can often be corrected with Lightroom’s healing tools. The goal should be selective correction rather than complete removal of every natural facial characteristic.
A professional retoucher should distinguish between temporary imperfections and permanent features. Removing a temporary breakout may improve the portrait, while removing a distinctive mole, scar, or natural feature can alter the subject’s identity. Client preferences should also guide decisions for commercial and personal portrait work.
Enhancing Eyes Naturally
Eyes are among the most important areas in portrait photography because they often establish the emotional connection between the viewer and subject. Lightroom can improve eye visibility through selective exposure, contrast, texture, and sharpening adjustments.
Avoid making eyes unnaturally bright or excessively sharp. A small increase in local contrast and detail can provide enough definition. If the whites of the eyes require correction, use extremely subtle adjustments because pure white eyes can quickly make a portrait look artificial.
Professional Eyebrow and Eyelash Enhancement
Eyebrows and eyelashes contribute significantly to facial definition. Slightly improving their contrast or detail can strengthen the overall portrait without requiring aggressive editing. Targeted masking makes these adjustments easier to control.
Avoid darkening eyebrows or eyelashes excessively. Heavy adjustments can create harsh lines that distract from the rest of the face. The strongest professional results usually come from enhancing existing detail rather than inventing new detail through extreme clarity or sharpening.
Enhancing Lips Without Overediting
Lips can be enhanced through subtle color, exposure, texture, and saturation adjustments. A targeted mask allows the photographer to modify the lips without changing surrounding skin tones.
Saturation should remain controlled because excessive color intensity can make lips look digitally painted. For professional portraits, slightly improving natural color and definition is generally more effective than applying dramatic color changes.
Controlling Facial Highlights
Facial highlights require careful attention because areas such as the forehead, nose, cheeks, and chin can reflect strong light. Excessive highlights may create distracting bright patches that dominate the portrait.
Use localized masking to reduce harsh highlights while preserving natural facial dimension. Lowering Highlights or Exposure slightly can restore balance. Avoid flattening every bright area because natural highlights provide depth and help communicate the direction and quality of the original lighting.
Improving Facial Shadows
Shadows define facial structure and contribute to depth. Removing every shadow can make the face appear flat, while excessive shadows can make the portrait look harsh or tired.
Use the Shadows adjustment selectively when necessary. A subtle lift can reveal important detail around the eyes, jawline, and cheek areas. Maintain enough contrast to preserve facial shape and dimensionality.
Refining Skin Tone With Color Adjustments
Color grading plays an important role in professional portrait work. Lightroom’s Color Mixer can adjust specific color ranges, including orange, red, yellow, and other tones that influence skin appearance.
Skin color adjustments should be subtle and consistent. Excessive orange saturation, excessive red reduction, or dramatic hue shifts can create unnatural complexions. Compare the edited portrait with the original frequently to ensure that color corrections remain believable.
Using Texture, Clarity, and Dehaze Carefully
Texture, Clarity, and Dehaze affect detail and local contrast differently. Texture can influence medium-sized details, Clarity affects local contrast, and Dehaze can produce stronger atmospheric and tonal effects.
For facial retouching, these controls should generally be used conservatively. Negative Texture can soften skin, while modest positive Texture can restore detail in areas such as eyebrows and hair. Strong Clarity or Dehaze adjustments are usually better suited to backgrounds or environmental elements than delicate facial skin.
Correcting Redness in Facial Areas
Facial redness can result from lighting, temperature, skin conditions, exercise, emotion, or camera color response. Lightroom’s masking and Color Mixer tools can help reduce distracting redness without changing the entire complexion.
Avoid removing all red tones from a face. Natural skin contains variations in color, especially around cheeks, nose, ears, and lips. A professional result balances these variations rather than creating a uniform skin color across the entire face.
Improving Hair Around the Face
Hair framing the face can strongly influence portrait quality. Stray hairs may distract attention, while overly dark or dull hair can reduce visual impact. Lightroom masking and local adjustments can improve hair contrast and definition.
Use selective sharpening and exposure adjustments where appropriate. Small distractions can be addressed with healing tools when the background is simple. Avoid excessive hair manipulation because complicated backgrounds can make removal artifacts obvious.
Balancing Face and Background Brightness
A beautifully retouched face can lose impact if the background is equally bright or visually distracting. Professional portrait editing considers the relationship between the subject and the environment.
A subtle background reduction can help direct attention toward the face. Lightroom’s subject and background masking features make this process efficient. Lowering background exposure slightly, reducing saturation, or controlling texture can create stronger visual hierarchy without making the subject appear artificially cut out.
Creating a Professional Portrait Color Grade
Color grading can establish the final mood of a portrait. Lightroom provides separate control over color characteristics in shadows, midtones, and highlights through its color grading tools.
Warm highlights can create an inviting appearance, while cooler shadows may introduce subtle cinematic separation. However, color grading should complement skin tones rather than overpower them. Professional portraits usually benefit from restrained color relationships that support the subject and photographic environment.
Sharpening a Retouched Face
Sharpening should normally be applied with awareness of image resolution and intended output. Excessive sharpening can emphasize pores, blemishes, compression artifacts, and unwanted facial texture.
Use Lightroom’s Detail panel and masking controls to keep sharpening focused on important edges. Eyes, eyebrows, eyelashes, hair, and clothing may benefit from stronger detail than smooth skin. This selective approach creates clarity without making the entire portrait look harsh.
Reducing Digital Noise
High-ISO portraits may contain luminance or color noise, particularly in darker facial regions and backgrounds. Lightroom’s noise-reduction controls can improve image quality, but aggressive noise reduction may remove skin texture and fine detail.
Apply noise reduction according to the photograph’s ISO level and output requirements. When working with a high-resolution portrait, evaluate the image at both 100% and normal viewing size. A little visible texture is often preferable to an overly smooth face.
Using Presets for Faster Retouching
Lightroom presets can accelerate portrait editing by providing a consistent starting point. Professional photographers can create customized presets containing preferred exposure, color, contrast, and detail settings.
Presets should never replace individual image evaluation. Lighting conditions, camera profiles, skin tones, and backgrounds vary between photographs. Apply the preset first, then adjust each portrait individually to maintain consistency without forcing identical settings onto every image.
Read Also: Advanced Beauty Retouching and Editing 2026
Building a Consistent Retouching Workflow
A reliable workflow improves both speed and quality. Start with profile correction and white balance, then establish exposure and contrast. Continue with lens corrections, cropping, masking, skin refinement, facial detail adjustments, color grading, sharpening, and final quality control.
Work from broad corrections toward precise adjustments. This approach prevents repeated edits and reduces the risk of compensating for problems that should have been corrected earlier. A structured workflow is especially valuable when processing large portrait collections.
Common Professional Lightroom Face Retouching Mistakes
One of the biggest mistakes is excessive skin smoothing. Another is over-brightening the eyes, increasing saturation too aggressively, or changing skin hue so dramatically that the subject no longer looks natural. These issues often result from editing while zoomed in for too long.
Another common mistake is ignoring the original lighting. Retouching cannot completely replace poorly controlled lighting without introducing unnatural results. Professional editing works best when the original photograph already contains good composition, focus, exposure, and lighting.
Avoiding the Plastic Skin Effect
The plastic skin effect occurs when texture, clarity, noise, and sharpness are manipulated excessively. Skin becomes unnaturally smooth and loses the microscopic details that communicate realism.
To avoid this problem, periodically disable your adjustments and compare the result with the original. If the edited portrait looks dramatically different in texture, reduce the strength of your masks. The best retouching often becomes difficult to notice because it integrates naturally with the original photograph.
Professional Retouching for Wedding Photography
Wedding portraits require careful retouching because photographs often represent important personal memories. Skin should look polished, but facial identity and emotional authenticity should remain intact.
For wedding photography, focus on consistent skin color, controlled highlights, natural eyes, clean distractions, balanced exposure, and cohesive color grading. Batch synchronization can help establish consistency across a wedding gallery, followed by individual corrections for each photograph.
Professional Retouching for Fashion Photography
Fashion photography may require a more stylized approach than traditional portrait work. Stronger color grading, controlled contrast, precise skin refinement, and selective detail enhancement can support a creative visual direction.
Even highly stylized fashion editing benefits from technical discipline. Skin texture, facial proportions, fabric details, and lighting should remain intentional. Lightroom can establish the overall photographic treatment, while more advanced pixel-level manipulation may be required for extensive commercial retouching.
Professional Retouching for Business Portraits
Corporate and professional headshots require clean, trustworthy, and realistic presentation. Excessive beauty editing can reduce credibility, particularly when the photograph is intended for a professional profile or company website.
Keep facial corrections subtle and prioritize accurate skin color, balanced lighting, clear eyes, controlled background distractions, and appropriate sharpening. The final photograph should communicate professionalism without appearing heavily edited.
Professional Retouching for Social Media Portraits
Social media images often require stronger visual impact because they compete with numerous photographs in fast-moving feeds. Nevertheless, excessive retouching can become obvious when viewed on high-resolution screens.
Optimize the portrait for the intended platform while preserving realistic skin texture. Moderate contrast, clean color, selective facial enhancement, and a visually controlled background can create an attractive result without sacrificing authenticity.
Before-and-After Comparison Techniques
A before-and-after comparison is essential during professional retouching. Lightroom allows photographers to evaluate changes and determine whether adjustments genuinely improve the photograph.
Compare the image at normal viewing size before examining fine details. Ask whether the face looks naturally illuminated, whether skin color remains believable, and whether the subject still looks like the original person. If an adjustment is noticeable before the viewer examines the photograph closely, it may be too strong.
Exporting Professionally Retouched Portraits
Export settings should match the intended destination. High-resolution files intended for printing require different considerations from web images or social media uploads.
Choose an appropriate color space, file format, resolution, and quality setting based on the final use. Keep an original high-quality master file before creating resized versions. This preserves flexibility for future printing, portfolio use, client delivery, or additional editing.
Lightroom Face Retouching for Beginners
Beginners should avoid attempting every advanced adjustment immediately. Start with white balance, exposure, highlights, shadows, texture, color, and basic masking. These controls provide a strong foundation for learning professional portrait editing.
Practice with different lighting conditions and facial characteristics. Study how small changes affect perceived skin quality and facial structure. Consistent practice develops visual judgment, which is more valuable than memorizing specific slider values.
Advanced Masking Techniques
Advanced users can combine multiple masks to create precise adjustments. A face mask can establish overall facial brightness, while separate masks can refine skin, eyes, lips, eyebrows, and hair.
Subtracting unwanted areas from automatic selections can improve accuracy. Feathering and gradual adjustments help create smooth transitions. The goal is precise control without visible boundaries between edited and unedited regions.
Maintaining Facial Identity
The most important principle of Professional Lightroom Face Retouching is preserving identity. Every subject has distinctive facial characteristics, skin texture, proportions, expressions, and natural features.
Retouching should enhance presentation rather than erase individuality. Professional photographers should consider the intended audience and client expectations before removing permanent features. Ethical and tasteful editing creates portraits that remain attractive while respecting the subject’s authentic appearance.
How to Create a Professional Lightroom Face Retouching Preset
A useful preset should contain foundational adjustments rather than aggressive facial corrections. Start with a balanced profile, moderate contrast, controlled highlights, natural color, and suitable sharpening.
Avoid including highly specific masking adjustments in a universal preset unless the preset is designed for a particular workflow. Save different presets for different lighting conditions, such as studio portraits, outdoor portraits, indoor portraits, and low-light photography. This approach creates a flexible professional editing system.
Mobile Lightroom Face Retouching
Adobe Lightroom on mobile provides many tools that support portrait enhancement. Photographers can adjust exposure, color, detail, masking, healing, and other elements directly from a smartphone or tablet.
Mobile editing works particularly well for social media portraits and quick client previews. However, precise retouching can be easier on a larger display because subtle skin transitions and mask edges are easier to inspect. For high-end professional work, a calibrated monitor remains preferable.
Tips for Faster Professional Retouching
Speed comes from workflow organization rather than aggressive editing. Develop consistent import, culling, correction, masking, color grading, and export stages. Use keyboard shortcuts and synchronized settings where appropriate.
Create reusable presets for recurring camera and lighting conditions. Batch-edit similar photographs first, then perform individual facial corrections. This method can significantly reduce processing time while maintaining a consistent appearance across a complete portrait session.
Final Quality-Control Checklist
Before delivering a professionally retouched portrait, inspect skin texture, facial color, eyes, lips, hair, exposure, shadows, highlights, background, and overall contrast. Zoom in to identify artifacts, then zoom out to judge the photograph as a complete composition.
Check the portrait against the original and verify that the subject still looks natural. Look for excessive smoothing, strange color shifts, visible mask edges, over-sharpening, and distracting healing artifacts. Export only after the image remains convincing at normal viewing size.
Best Practices for Professional Lightroom Face Retouching
The strongest results come from restraint, consistency, and careful observation. Use masks for targeted adjustments, preserve natural texture, correct temporary imperfections selectively, maintain realistic skin tones, and avoid excessive clarity or sharpening.
Professional retouching should support photography rather than overpower it. A well-edited portrait looks clean, balanced, polished, and natural. The viewer should notice the quality of the photograph before noticing the editing process behind it.
Frequently Asked Questions
What is professional Lightroom face retouching?
Professional Lightroom Face Retouching is the process of enhancing portrait photographs using Lightroom tools while maintaining natural facial features and realistic skin texture. It includes exposure correction, skin refinement, color adjustment, facial detail enhancement, and selective masking.
Can Lightroom be used for professional face retouching?
Yes. Lightroom provides powerful tools for professional portrait editing, including Masking, Healing, Texture, Clarity, Color Mixer, Detail, and local adjustment controls. These tools are suitable for many portrait-retouching workflows.
How do I smooth skin naturally in Lightroom?
Use a selective skin mask and reduce Texture moderately. Avoid excessive Clarity reduction or heavy noise reduction because these settings can remove pores and fine details, creating an artificial appearance.
How can I remove facial blemishes in Lightroom?
Use Lightroom’s Healing tools to correct temporary blemishes, dust spots, and small distractions. Work carefully and avoid removing permanent characteristics that contribute to the subject’s identity.
How can I improve eyes in Lightroom?
Create a targeted mask around the eyes and make subtle adjustments to exposure, texture, contrast, or sharpening. Avoid making the eyes excessively bright, sharp, or white because this can make the portrait look unnatural.
Can Lightroom improve skin color?
Yes. Lightroom’s White Balance, Color Mixer, and masking tools can help correct uneven or distracting skin colors. Adjust skin tones carefully to preserve natural complexion and avoid excessive orange, red, or yellow tones.
Should I use Lightroom presets for face retouching?
Presets can provide a useful starting point and speed up editing, especially for large portrait collections. However, every photograph should receive individual adjustments because lighting, skin tones, exposure, and camera conditions vary.
How can I avoid the plastic skin effect?
Keep Texture reduction moderate and preserve natural facial detail. Frequently compare the edited portrait with the original and evaluate the image at normal viewing size rather than relying only on highly zoomed-in views.
Is Lightroom suitable for professional wedding portrait retouching?
Yes. Lightroom is particularly effective for wedding photography because photographers can synchronize exposure, color, and foundational retouching adjustments across large collections. Individual portraits can then receive targeted facial corrections.
What is the most important rule of professional Lightroom face retouching?
The most important rule is preserve natural appearance and facial identity. Professional retouching should correct distractions and improve presentation without making the subject look like a completely different person.
Conclusion
Professional Lightroom face retouching combines technical Lightroom knowledge with strong visual judgment. Effective portrait editing does not depend on extreme filters or dramatic skin smoothing. Instead, it relies on controlled exposure, accurate color, selective masking, subtle texture adjustments, natural facial enhancement, and thoughtful finishing.
Whether editing wedding portraits, fashion images, business headshots, social media photographs, or personal portraits, Lightroom provides a flexible environment for producing professional results.
