

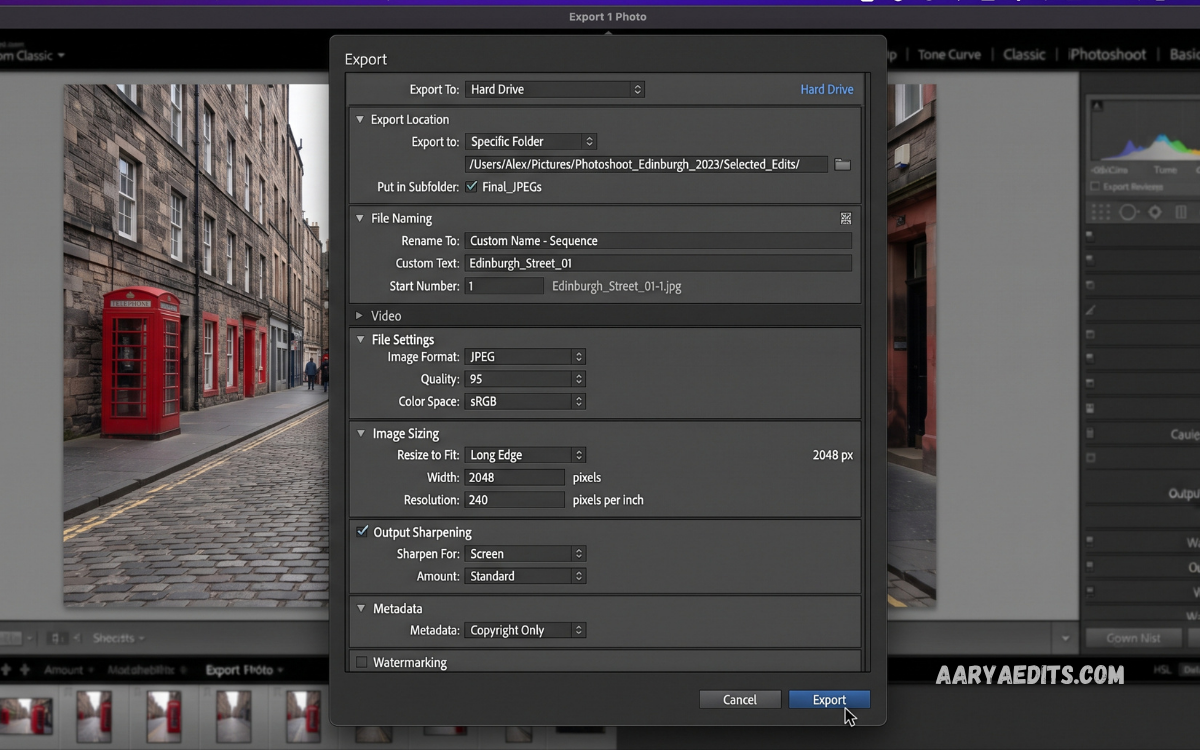
Lightroom Export Settings determine how your edited photos look after leaving Adobe Lightroom. Even a professionally edited image can lose quality, sharpness, color accuracy, or detail when exported with unsuitable settings. Choosing the correct format, resolution, quality, color space, dimensions, sharpening, and metadata options helps maintain the intended appearance of every photograph.
Whether you are exporting photos for Instagram, Facebook, websites, YouTube thumbnails, photography portfolios, printing, or personal storage, Lightroom provides flexible export controls. Understanding these options allows photographers to create optimized files for different platforms without repeatedly editing the original image.
What Are Lightroom Export Settings?
Lightroom Export Settings are the controls used to determine how an edited photograph is saved and prepared for use outside Lightroom. The original Lightroom catalog and RAW file remain unaffected, while the export creates a new image according to the selected specifications.
These settings control file format, image quality, dimensions, resolution, color space, sharpening, metadata, and file location. Different purposes require different settings, so there is no single export configuration that works perfectly for every situation.
Best Lightroom Export Settings for General Use
For everyday photography, JPEG is usually the most convenient export format. It provides excellent visual quality while keeping file sizes manageable, making it suitable for sharing, uploading, and storing finished photographs.
A strong general-purpose configuration is JPEG format, 90–100 quality, sRGB color space, full-resolution dimensions, and output sharpening appropriate for the intended display. If the photograph is being archived for future editing, consider keeping the original RAW file instead of relying only on a JPEG export.
Lightroom Export Settings for Instagram
Social media platforms commonly resize uploaded photographs. Preparing an appropriately sized image before uploading can provide more predictable results and reduce unnecessary compression.
For Instagram, export JPEG files using the sRGB color space. For portrait-oriented posts, a 4:5 ratio is commonly used, while square and landscape formats can be exported according to the intended composition. A quality setting around 80–90 can provide a useful balance between visual quality and file size.
Use output sharpening designed for screen viewing. Avoid excessive sharpening because social platforms may apply additional processing after upload.
Lightroom Export Settings for Facebook
Facebook also processes uploaded images, so properly preparing the file before upload can help preserve clarity and color consistency. JPEG remains the practical choice for most photographs.
Use sRGB color space and a high-quality JPEG setting. Resize the image when necessary according to the intended Facebook placement, such as a feed post, profile image, or cover graphic. Screen sharpening can help retain perceived detail after platform compression.
Lightroom Export Settings for Websites
Website images should balance quality and loading performance. Extremely large photographs can slow page loading, while overly compressed images may appear soft or contain visible compression artifacts.
For website publishing, export JPEG images in sRGB and resize them to approximately the dimensions required by the website layout. Quality around 75–85 is often a useful starting point, although the ideal setting depends on the image and compression requirements.
JPEG Quality Settings in Lightroom
The Quality slider determines how much JPEG compression is applied during export. Higher values generally preserve more visual information while creating larger files.
A quality value near 100 is not always necessary. For online publishing, a setting around 80–90 can often provide excellent visual results with significantly smaller files. For important high-quality exports, 90–100 may be preferable.
Choosing the Right File Format
Lightroom supports several export formats, each designed for different purposes.
JPEG: Best for websites, social media, email, and general sharing. It offers broad compatibility and relatively small file sizes.
TIFF: Suitable for high-quality workflows, professional printing, and further editing. TIFF files are considerably larger than JPEG files but can preserve more image information.
PNG: Useful when transparency is required or when exporting certain graphics. PNG is not normally the first choice for standard photographic delivery.
Original/RAW: Useful when the original camera file needs to be preserved or delivered. RAW files retain extensive editing information but are not ideal for general web publishing.
Lightroom Color Space Settings
Color space is one of the most important Lightroom Export Settings because it affects how colors are interpreted by different devices and platforms.
sRGB is the safest choice for websites, social media, online galleries, and general digital sharing. Most consumer displays and online services are designed around sRGB.
Adobe RGB provides a wider color gamut and can be useful for specific professional workflows, especially when the receiving system supports it.
ProPhoto RGB provides an extremely wide color gamut and is valuable during editing workflows, but it is generally unsuitable for ordinary web delivery.
For most online exports, choose sRGB.
Image Sizing Options
Lightroom allows you to resize exported images using options such as Width & Height, Long Edge, Short Edge, Megapixels, or specific dimensions.
The Long Edge option is particularly useful when you want consistent maximum dimensions without calculating both width and height. Lightroom automatically maintains the photograph’s original aspect ratio.
Resolution Settings
Resolution is frequently misunderstood because pixel dimensions generally matter more than DPI for online images.
For digital publishing, the actual pixel dimensions determine how large an image can appear on screens. The resolution field, commonly expressed as pixels per inch, becomes more important when preparing files for physical printing.
Output Sharpening
Output sharpening compensates for some softness introduced when an image is resized or prepared for a particular output medium.
Lightroom typically provides sharpening choices such as Screen, Matte Paper, and Glossy Paper. Screen sharpening is appropriate for websites, social media, and digital displays. Paper-specific sharpening should be selected when preparing photographs for physical printing.
Metadata Settings
Metadata contains information associated with an image, such as camera details, copyright information, location information, and other descriptive data.
Lightroom provides different metadata export options. Photographers publishing images online should review these settings carefully, especially when photographs contain location or other information they do not want to distribute.
Watermarking During Export
Lightroom can apply a watermark during export. This feature can be useful for photographers who publish preview images, portfolios, or promotional work online.
A watermark should remain subtle enough that it does not distract from the photograph. Consider using a small logo, name, or copyright notice positioned consistently across your exported images.
File Naming Settings
Consistent file names make large photography collections easier to organize. Lightroom can rename photographs during export using custom naming templates.
A practical naming structure can include a project name, date, sequence number, or subject. For example, a professional workflow might use a format such as:
ProjectName_2026_001.jpg
Avoid unnecessary special characters and excessively complicated naming systems. A consistent structure is more valuable than a complex one.
Best Lightroom Export Settings for Printing
Printing requires more attention to resolution, dimensions, color management, sharpening, and file format than online publishing.
If a professional print laboratory provides specific export instructions, follow those instructions instead of relying on generic settings. They may specify color profiles, file formats, dimensions, resolution, and sharpening requirements.
Read Also: Best Lightroom Settings: Complete Guide for Professional Photo Editing
Lightroom Export Settings for Full-Resolution Photos
When you need maximum-resolution JPEG files, disable unnecessary resizing and select a high JPEG quality value. Use the appropriate color space for the intended destination.
This approach is useful for client galleries, personal archives, large displays, and situations where the recipient needs the highest practical JPEG resolution.
Lightroom Export Settings for Email
Email attachments usually benefit from smaller dimensions and moderate compression. Sending a massive full-resolution photograph can create unnecessary upload and download times.
Resize images according to the recipient’s needs and use JPEG format. A moderate quality setting can provide attractive results while keeping the attachment manageable.
Common Lightroom Export Mistakes
One common mistake is exporting everything at maximum quality and resolution. Although this preserves excellent image quality, it can create unnecessarily large files for websites and social media.
Another mistake is using the wrong color space. Exporting online photographs in a color space that the destination does not handle correctly can lead to unexpected colors.
Recommended Lightroom Export Presets
Creating export presets can make repetitive workflows much faster. Instead of manually changing settings every time, save configurations for common destinations.
Useful presets include:
- Social Media JPEG: sRGB, JPEG, moderate-high quality, screen sharpening.
- Website JPEG: sRGB, resized dimensions, quality around 75–85.
- Full Resolution JPEG: sRGB, maximum practical dimensions, quality 90–100.
- Print JPEG: dimensions and resolution based on the print requirement.
- High-Quality TIFF: TIFF format, appropriate color settings, and professional print workflow.
Presets reduce mistakes and create consistency across projects.
How to Choose the Best Lightroom Export Settings
Start by identifying where the photograph will be used. A website image has different requirements from a billboard, social media post, client archive, or fine-art print.
Next, select the appropriate file format and color space. Then determine whether resizing is required. After that, choose the correct output sharpening option and review metadata preferences.
Lightroom Export Settings: Quick Reference
| Purpose | Format | Color Space | Quality | Sharpening |
|---|---|---|---|---|
| Social Media | JPEG | sRGB | 80–90 | Screen |
| Website | JPEG | sRGB | 75–85 | Screen |
| General Sharing | JPEG | sRGB | 85–95 | Screen |
| Full Resolution | JPEG | Destination-dependent | 90–100 | Screen |
| Professional Print | JPEG/TIFF | Lab-dependent | High | Paper-specific |
| Further Editing | TIFF | Workflow-dependent | High | Usually minimal |
Frequently Asked Questions
What are the best Lightroom Export Settings for Instagram?
Use JPEG format, sRGB color space, suitable dimensions for the Instagram post format, and screen output sharpening. A quality setting around 80–90 is a practical starting point.
What Lightroom Export Settings are best for websites?
Use JPEG, sRGB, appropriately resized dimensions, and moderate compression. A quality setting around 75–85 can provide a strong balance between image quality and website performance.
Should I export Lightroom photos as JPEG or PNG?
JPEG is generally better for photographs because it provides excellent quality with smaller file sizes. PNG is more useful when transparency or lossless graphic compression is required.
What color space should I use when exporting from Lightroom?
Use sRGB for most websites, social media platforms, online galleries, and general digital sharing. Use wider color spaces only when the receiving workflow specifically supports them.
Is Lightroom quality 100 better than 80?
Quality 100 applies less JPEG compression, but the visible improvement over a well-exported quality 80–90 image can be small while the file size may increase considerably. Choose the quality based on the final use.
What resolution should I use for Lightroom exports?
For online images, focus primarily on pixel dimensions rather than the resolution value. For printing, follow the print lab’s specifications; 300 pixels per inch is a common professional target.
Should I use output sharpening in Lightroom?
Yes, output sharpening can help maintain perceived detail after resizing or preparing images for a specific medium. Choose Screen for digital use and the appropriate paper setting for printing.
Can I create Lightroom Export Presets?
Yes. Lightroom allows you to save export configurations as presets. Creating presets for social media, websites, printing, and full-resolution delivery can make your workflow faster and more consistent.
Conclusion
The best Lightroom Export Settings depend on the final destination rather than one universal configuration. JPEG with sRGB is an excellent choice for most online uses, while TIFF and specialized color workflows can be better for professional printing and advanced production.
Developing a few reliable export presets for social media, websites, full-resolution delivery, and printing can save time and improve consistency. Always consider image dimensions, JPEG quality, color space, sharpening, metadata, and the requirements of the final platform before exporting.
