

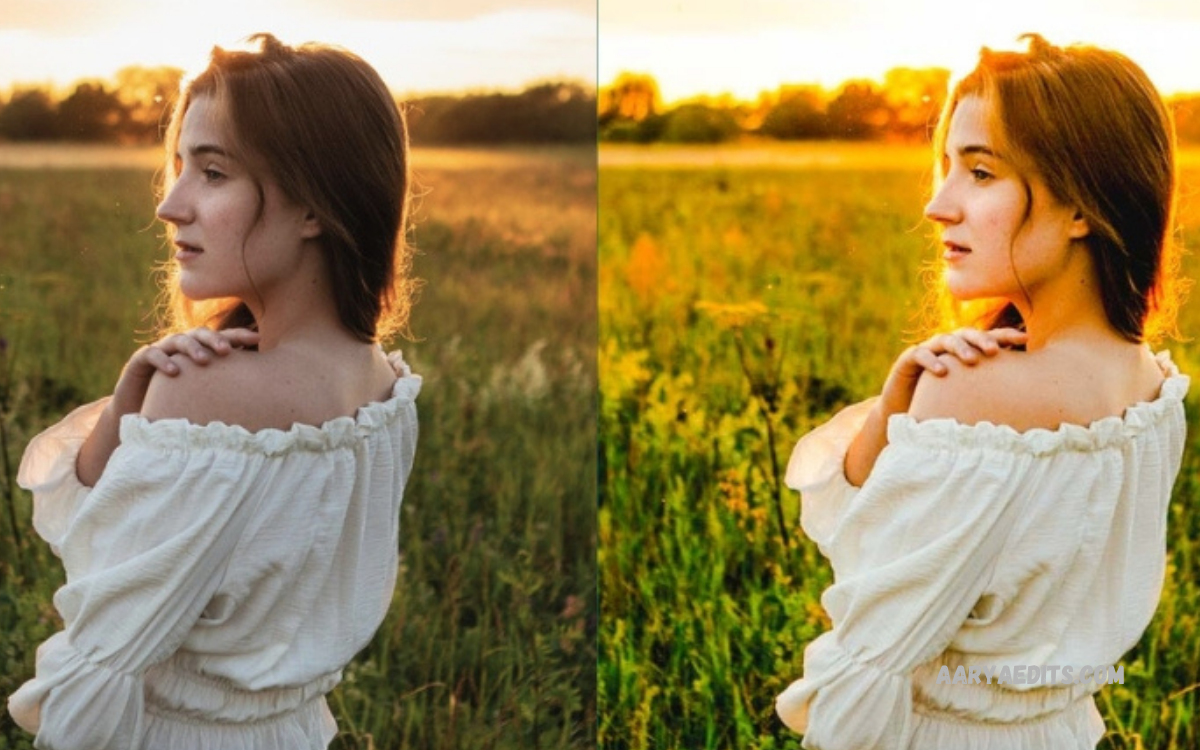
Lightroom Golden Hour Presets provide photographers with a fast, professional way to recreate the warm, glowing atmosphere associated with sunset and sunrise photography. These presets transform ordinary images through carefully balanced adjustments involving exposure, white balance, highlights, shadows, contrast, saturation, color grading, and tone curves.
Golden hour photography remains popular because soft sunlight creates depth, warmth, natural highlights, and cinematic color. With the right Lightroom Golden Hour Preset, photographers can enhance these characteristics while maintaining realistic skin tones, detailed shadows, and natural-looking colors across portraits, landscapes, travel photographs, weddings, and lifestyle content.
What Are Lightroom Golden Hour Presets?
Lightroom Golden Hour Presets are predefined editing settings designed to create the visual appearance of warm-hour sunlight. Instead of manually adjusting numerous Lightroom controls, photographers can apply a preset and establish a consistent golden-hour foundation within seconds.
These presets commonly increase warm tones, refine contrast, soften highlights, enhance orange and yellow colors, deepen selected shadows, and introduce subtle cinematic color grading. Results vary according to the original photograph, lighting conditions, camera profile, lens characteristics, and preset settings.
Why Are Golden Hour Presets Popular?
Golden hour creates naturally attractive lighting, although capturing perfect conditions requires timing, location planning, and suitable weather. Lightroom Golden Hour Presets allow photographers to enhance existing sunlight or simulate certain characteristics of warm evening illumination during post-processing.
Another advantage involves consistency. Photographers managing portraits, travel galleries, social-media content, wedding collections, or photography portfolios can use a similar preset foundation across multiple images, creating a cohesive visual identity without editing every photograph from scratch.
Key Features of Lightroom Golden Hour Presets
A professional golden-hour preset typically focuses on several important Lightroom adjustments. Warm white balance establishes the foundational glow, while controlled highlights prevent bright areas from becoming distracting or losing important details.
Tone curves can add refined contrast and cinematic depth, while HSL adjustments help control orange, yellow, red, and green tones. Color grading can introduce subtle warmth into highlights while maintaining balanced shadows, producing an attractive image without excessive orange coloration.
Warm White Balance
White balance plays a major role in creating convincing golden-hour photography. Increasing temperature can introduce warmer yellow and orange characteristics, helping an image appear more closely associated with sunset or sunrise illumination.
However, excessive warmth can make skin tones appear unnatural and turn neutral surfaces noticeably yellow. Professional Lightroom Golden Hour Presets therefore require controlled temperature adjustments rather than simply increasing warmth to extreme levels.
Highlight Control
Golden-hour sunlight often contains bright areas around the sun, sky, buildings, reflective surfaces, or hair. Highlight adjustments help preserve detail within these bright regions while maintaining the luminous quality that makes golden-hour photographs visually appealing.
Reducing highlights slightly can recover sky texture and prevent bright portions from appearing completely white. The ideal setting depends on the camera file, exposure level, dynamic range, and brightness distribution within the photograph.
Shadow Enhancement
Shadows create depth within golden-hour images, particularly when sunlight enters from a low angle. Carefully lifting shadows can reveal important details while retaining enough contrast to preserve the dimensional appearance of the photograph.
Over-brightening shadows can flatten an image and reduce the dramatic atmosphere associated with sunset photography. A balanced Lightroom Golden Hour Preset should reveal useful shadow information without eliminating natural depth.
Color Temperature and Tint
Temperature controls the overall warm or cool appearance of an image, while tint helps balance green and magenta color characteristics. Golden-hour edits generally favor warmer temperatures, although tint adjustments remain important for maintaining realistic skin and environmental colors.
Different cameras can produce noticeably different color responses under identical lighting. Consequently, photographers should treat a preset as a starting point and fine-tune temperature and tint according to the original RAW file.
HSL Adjustments
The Hue, Saturation, and Luminance panel offers detailed control over individual colors. Orange and yellow adjustments are particularly important for golden-hour editing because these colors strongly influence the appearance of warm sunlight.
Reducing excessive yellow saturation can create a sophisticated appearance, while carefully increasing orange luminance can improve skin tones. Green and aqua adjustments may also help create cleaner backgrounds, especially in outdoor portraits and landscape photographs.
Tone Curve Adjustments
Tone curves provide advanced control over brightness and contrast. A subtle S-curve can increase separation between highlights and shadows, producing a polished cinematic appearance without relying exclusively on the basic contrast slider.
Some photographers also use a gentle lifted-black effect for a softer film-inspired appearance. Such adjustments should remain subtle because aggressive curves can reduce image detail and create unnatural tonal transitions.
Lightroom Golden Hour Presets for Portraits
Portrait photography benefits significantly from warm golden-hour editing because soft sunlight naturally complements skin tones and creates attractive edge lighting. Lightroom Golden Hour Presets can emphasize these characteristics while adding warmth and consistency throughout a portrait collection.
Skin tones should remain the primary consideration when applying any warm preset. If faces become excessively orange, red, or yellow, photographers should reduce orange saturation, adjust luminance, refine white balance, or use Lightroom masking tools for localized corrections.
Golden Hour Presets for Landscapes
Landscape photography provides excellent opportunities for golden-hour editing because warm sunlight interacts with mountains, trees, architecture, water, clouds, and open skies. A suitable preset can emphasize atmospheric depth while strengthening the visual relationship between sunlight and environmental colors.
For landscapes, photographers can often use stronger contrast and color adjustments than they would for portraits. Nevertheless, natural appearance remains important because excessive saturation can make vegetation, skies, and distant objects look artificial.
Golden Hour Presets for Travel Photography
Travel photographs frequently contain mixed lighting, different environments, and varying exposure levels. Lightroom Golden Hour Presets can establish a consistent appearance across an entire travel collection, helping images from different locations feel visually connected.
Warm color grading can also strengthen the emotional quality of travel photographs. Golden streets, beaches, historic architecture, mountain landscapes, and outdoor cafés can benefit from subtle warmth that reinforces the atmosphere captured during the original experience.
Golden Hour Presets for Wedding Photography
Wedding photographers often use warm color grading to create romantic, elegant, and timeless imagery. Golden-hour presets can enhance outdoor couple portraits, wedding-party photographs, reception details, and sunset sessions while reducing editing time across large collections.
Consistency remains especially valuable during wedding editing because hundreds or thousands of photographs may require similar treatment. A carefully designed preset can provide a dependable foundation, followed by individual exposure, white balance, cropping, and masking adjustments.
How to Apply Lightroom Golden Hour Presets
Applying a preset in Lightroom requires selecting the photograph, opening the Presets panel, choosing the desired golden-hour preset, and reviewing the resulting adjustments. After application, photographers should inspect exposure, white balance, highlights, shadows, skin tones, and color saturation before exporting the final image.
Presets are not universal solutions because every photograph contains different lighting conditions and tonal information. Professional results usually require minor customization after preset application, allowing the original image characteristics to remain visible.
Creating Your Own Golden Hour Preset
Creating a custom preset provides greater control than relying exclusively on downloaded editing profiles. Begin with a well-exposed photograph containing warm natural light, then adjust white balance, exposure, contrast, highlights, shadows, tone curve, HSL, color grading, and sharpening according to the desired visual style.
Once the adjustments produce a repeatable appearance, save them as a Lightroom preset. Consider excluding exposure and white balance from the saved preset when working with photographs captured under significantly different lighting conditions, because these settings often require individual adjustment.
Golden Hour Presets for RAW Photos
RAW photographs provide substantial editing flexibility because they preserve considerably more image information than compressed formats. This additional information allows photographers to adjust highlights, shadows, color temperature, contrast, and tonal detail while maintaining greater control over the final result.
Lightroom Golden Hour Presets work particularly well with RAW files because photographers can refine the preset settings without being limited by heavily compressed image data. JPEG images can also benefit, although aggressive adjustments may produce visible artifacts or reduced color quality.
Common Mistakes When Using Golden Hour Presets
One common mistake involves excessive warmth. Increasing temperature, orange saturation, and yellow saturation simultaneously can create an overly orange image that looks artificial rather than naturally illuminated.
Another mistake involves applying identical settings to every photograph. Differences in exposure, lighting direction, camera profiles, skin tones, and environmental colors mean that each image may require small corrections after applying the same preset.
How to Make Golden Hour Edits Look Natural
Natural golden-hour editing depends on restraint. Instead of dramatically changing every color, focus on enhancing existing warm light, preserving realistic skin tones, maintaining highlight detail, and creating controlled contrast.
Local adjustments can improve realism even further. Lightroom masking tools allow photographers to brighten subjects, warm selected areas, recover skies, enhance sunlight, or reduce distracting colors without affecting the entire photograph.
Lightroom Golden Hour Presets for Mobile
Lightroom Mobile makes preset-based editing accessible for photographers working directly from smartphones and tablets. Presets can help users achieve consistent results without manually adjusting every slider on a small touchscreen.
Mobile photographers should still review exposure and white balance after applying a preset. Smartphone cameras use computational photography differently from dedicated cameras, so the same golden-hour preset may produce different results depending on the device and original image.
Read Also: Lightroom White Presets: Complete Guide for Clean, Bright Photos
Free vs Premium Golden Hour Presets
Free Lightroom Golden Hour Presets can provide useful starting points for beginners experimenting with warm photography styles. They may include basic adjustments suitable for portraits, landscapes, social-media images, and casual travel photographs.
Premium preset collections often provide greater variety, specialized versions, detailed documentation, and carefully developed color profiles. Regardless of price, photographers should evaluate whether a preset produces natural results and supports their preferred photography style rather than choosing based solely on the number of included presets.
Choosing the Best Lightroom Golden Hour Presets
The best preset depends on the photograph and desired visual direction. Portrait photographers may prioritize natural skin tones and soft highlights, while landscape photographers may prefer stronger contrast, atmospheric warmth, and richer environmental colors.
Before building a complete workflow around a preset, test it across different photographs. A high-quality preset should remain flexible enough to produce attractive results after minor adjustments rather than requiring extensive correction on every image.
Golden Hour Presets for Social Media
Social-media creators often require visually consistent images because a cohesive feed can strengthen their overall visual identity. Lightroom Golden Hour Presets can provide a recognizable warm aesthetic across lifestyle, travel, fashion, food, and outdoor content.
Consistency should not come at the expense of image quality. Adjusting exposure, cropping, composition, and individual colors after applying the preset helps ensure each photograph remains visually strong while still fitting the overall aesthetic.
Professional Editing Workflow
A professional workflow usually begins with selecting and organizing photographs before making global corrections. After applying a Lightroom Golden Hour Preset, review exposure, white balance, highlights, shadows, color balance, and contrast before moving toward localized adjustments.
Masking can then refine the subject, sky, background, or important light sources. Final steps may include sharpening, noise reduction, lens corrections, cropping, and export settings appropriate for websites, social media, printing, or client delivery.
Benefits of Lightroom Golden Hour Presets
The primary advantage involves speed. A preset can establish a complex color foundation almost instantly, reducing repetitive editing work and allowing photographers to spend more time on composition, storytelling, and creative decisions.
Presets also improve consistency across collections. When carefully customized, they can help establish a recognizable visual style that strengthens photography portfolios, social-media profiles, professional galleries, and client projects.
Frequently Asked Questions
What Are Lightroom Golden Hour Presets?
Lightroom Golden Hour Presets are preconfigured editing settings designed to add warm tones, soft highlights, balanced contrast, and a sunset-inspired appearance to photographs.
Are Lightroom Golden Hour Presets Good for Portraits?
Yes. They can enhance portrait photography by creating warmer tones and improving the atmosphere while maintaining natural-looking skin when applied carefully.
Can I Use Golden Hour Presets on RAW Photos?
Yes. RAW files provide greater flexibility for adjusting exposure, white balance, highlights, shadows, and colors after applying a preset.
Do Golden Hour Presets Work With Lightroom Mobile?
Yes. Compatible presets can be used in Lightroom Mobile, allowing photographers to create warm golden-hour effects directly on smartphones and tablets.
Can I Create My Own Golden Hour Preset?
Yes. You can customize temperature, tint, highlights, shadows, tone curves, HSL, and color grading, then save the settings as your own preset.
Are Free Lightroom Golden Hour Presets Worth Using?
Free presets can be useful for beginners and experimentation. Results depend on the preset quality and how well its settings match your original photograph.
How Do I Make a Golden Hour Effect Look Natural?
Use moderate warmth, preserve highlight details, maintain realistic skin tones, and make individual adjustments after applying the preset.
Can Golden Hour Presets Be Used for Landscapes?
Yes. They can enhance sunsets, mountains, beaches, architecture, forests, and outdoor scenes by adding warmth and improving tonal depth.
Why Does My Photo Look Too Orange After Applying a Preset?
The preset may increase temperature or orange and yellow saturation too strongly. Reduce those settings and fine-tune white balance for a more natural result.
What Is the Best Lightroom Golden Hour Preset?
The best preset depends on your photography style and image. A good preset should provide warm, balanced colors while allowing easy customization for different lighting conditions.
Conclusion
Lightroom Golden Hour Presets offer an efficient approach to creating warm, cinematic, and visually appealing photographs. By combining controlled warmth, refined highlights, balanced shadows, selective color adjustments, and subtle contrast, photographers can enhance the atmosphere of sunset and sunrise imagery without sacrificing realism.
The strongest results come from treating presets as creative foundations rather than one-click solutions. Apply the preset, evaluate the photograph, make targeted corrections, and preserve natural colors wherever possible, allowing each image to maintain its unique lighting and character while benefiting from a polished golden-hour aesthetic.
