

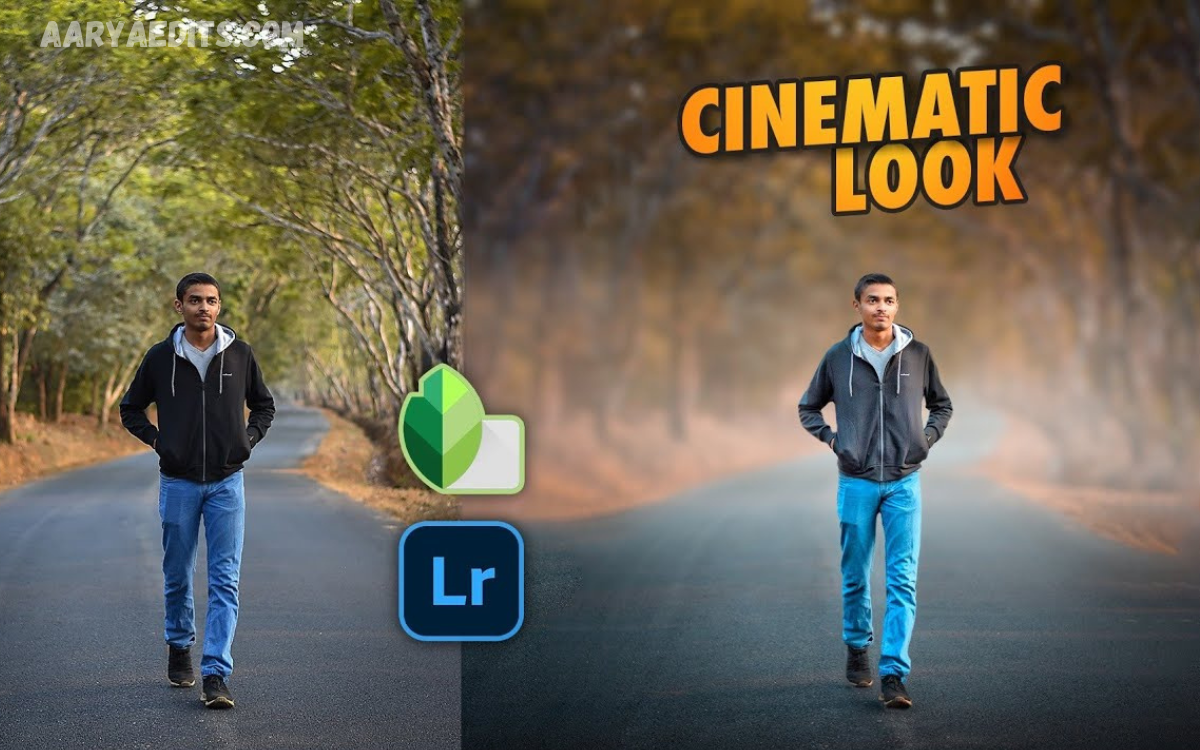
Cinematic photo editing is a creative process that transforms ordinary images into visually stunning photographs with the mood, color, and storytelling style of a movie scene. By carefully adjusting lighting, colors, contrast, shadows, and depth, you can create dramatic and professional-looking photos that capture attention instantly.
When editing portraits, landscapes, travel photos, or lifestyle images, cinematic editing helps add emotion, atmosphere, and a polished cinematic feel. The key to achieving a cinematic look is following a structured editing workflow. Start by correcting exposure and white balance, then enhance contrast and adjust highlights and shadows to create depth.
Why Is Cinematic Editing So Popular?
Professional photographers, influencers, filmmakers, travel bloggers, wedding photographers, and content creators use cinematic editing because it creates a premium visual experience.
Major benefits include:
- Professional appearance
- Better storytelling
- Increased engagement on social media
- Stronger emotional connection
- Higher-quality portfolio
- Brand consistency
- Eye-catching visual style
Step 1: Choose the Right Photo
Every cinematic edit starts with a strong image.
Look for photos that include:
- Natural lighting
- Good composition
- Clear subject
- Interesting background
- High resolution
- RAW format if possible
RAW files preserve more detail, giving you greater flexibility during editing.
Step 2: Import Your Image
Import the photo into your preferred editing software.
Popular editing software includes:
- Adobe Lightroom
- Adobe Photoshop
- Capture One
- Luminar Neo
- Affinity Photo
- Darktable
- Snapseed (Mobile)
Always create a duplicate before making major edits to preserve the original file.
Step 3: Adjust Exposure
Proper exposure forms the foundation of cinematic editing.
Start by correcting:
- Exposure
- Highlights
- Shadows
- Whites
- Blacks
The goal is balanced lighting while preserving details in bright and dark areas.
Avoid overexposing highlights, as lost details are difficult to recover.
Step 4: Correct White Balance
White balance controls the overall temperature of your image.
For cinematic effects:
- Warm images create emotional scenes.
- Cool images create mystery.
- Neutral tones produce realistic results.
Fine-tune:
- Temperature
- Tint
This adjustment greatly influences the mood of the final image.
Step 5: Increase Contrast Carefully
Contrast adds depth.
Instead of applying extreme contrast:
- Increase gradually.
- Protect shadow details.
- Maintain highlight texture.
Balanced contrast gives photos a professional movie appearance.
Step 6: Fine-Tune the Tone Curve
Professional editors rely heavily on the Tone Curve.
The Tone Curve allows you to:
- Lift shadows
- Lower highlights
- Increase midtone contrast
- Create soft blacks
- Produce faded film effects
A subtle S-curve often creates the perfect cinematic foundation.
Step 7: Apply Professional Color Grading
Color grading is the defining feature of cinematic editing.
Popular cinematic color combinations include:
Teal and Orange
- Orange for skin tones
- Teal for shadows
- Balanced contrast
This combination is widely used in Hollywood films.
Blue and Gold
Ideal for:
- Travel photography
- Landscapes
- Fashion portraits
Green and Brown
Perfect for:
- Nature photography
- Forest scenes
- Adventure photography
Use the Color Grading panel to adjust shadows, midtones, and highlights separately.
Read Also: Vintage Lightroom Presets: The Ultimate Guide for Professional Photographers
Step 8: Reduce Saturation
One common mistake is oversaturation.
Professional cinematic images usually feature:
- Slightly muted colors
- Rich tones
- Controlled vibrance
Instead of increasing Saturation, increase Vibrance moderately while keeping colors natural.
Step 9: Enhance Skin Tones
Portrait photography requires careful skin tone adjustments.
Keep skin:
- Smooth
- Natural
- Even
- Realistic
Avoid excessive skin softening.
Healthy skin texture appears more professional than artificial perfection.
Step 10: Add Depth Using Local Adjustments
Local editing helps guide the viewer’s eye.
Use:
- Radial Filters
- Graduated Filters
- Adjustment Brush
- AI Subject Mask
Brighten the subject while subtly darkening the background for cinematic depth.
Step 11: Sharpen Important Details
Sharpen selectively.
Focus on:
- Eyes
- Hair
- Clothing texture
- Architectural details
Avoid sharpening noisy backgrounds.
Professional photographers use masking to sharpen only essential areas.
Step 12: Reduce Noise
Noise becomes visible in:
- Low-light photos
- High ISO images
Apply moderate noise reduction without removing important textures.
Modern AI noise reduction tools produce excellent results.
Step 13: Add a Cinematic Vignette
A vignette naturally draws attention toward the subject.
Use:
- Soft edges
- Subtle darkening
- Balanced intensity
Heavy vignettes often appear outdated.
Step 14: Introduce Film Grain
Film grain recreates the appearance of classic cinema.
Benefits include:
- Organic texture
- Vintage atmosphere
- Professional finish
Keep grain subtle.
Too much grain reduces image quality.
Step 15: Crop Like a Movie Scene
Composition plays a major role.
Popular aspect ratios include:
- 16:9
- 2.35:1
- 21:9
These widescreen formats create an authentic cinematic look.
Maintain proper framing throughout the composition.
Step 16: Refine Colors
Zoom in and inspect every color.
Adjust:
- Greens
- Blues
- Reds
- Yellows
Use the HSL panel to modify:
- Hue
- Saturation
- Luminance
Small adjustments often produce significant improvements.
Step 17: Dodge and Burn
Dodging brightens selected areas.
Burning darkens selected areas.
These techniques enhance:
- Facial contours
- Clothing texture
- Landscapes
- Buildings
- Dramatic lighting
Professional editors use subtle dodge and burn for realistic depth.
Step 18: Final Quality Check
Before exporting:
Check:
- Horizon alignment
- Color consistency
- Skin tone accuracy
- Sharpness
- Noise
- Cropping
- Distractions
- Export settings
Small refinements often separate amateur edits from professional work.
Export Settings
For websites:
- JPEG
- sRGB
- 80–90% quality
- Optimized file size
For printing:
- TIFF
- Adobe RGB
- Maximum quality
- 300 DPI
For social media:
- High-quality JPEG
- Correct dimensions
- Light sharpening
Common Mistakes to Avoid
Many beginners make similar editing mistakes.
Avoid:
- Oversaturation
- Excessive HDR
- Unrealistic skin smoothing
- Extreme contrast
- Heavy sharpening
- Strong vignettes
- Overuse of filters
- Ignoring white balance
- Inconsistent color grading
- Poor cropping
Professional editing emphasizes subtlety and balance.
Best Software for Cinematic Editing
Popular tools include:
- Adobe Lightroom Classic
- Adobe Photoshop
- Capture One Pro
- Luminar Neo
- Affinity Photo
- ON1 Photo RAW
- Darktable
- Snapseed
- VSCO
Choose software based on your workflow, budget, and editing goals.
Tips for Better Cinematic Results
Improve your editing by following these practices:
- Shoot in RAW format.
- Use natural light whenever possible.
- Study movie color palettes.
- Build your own presets.
- Calibrate your monitor.
- Edit with consistency.
- Keep colors natural.
- Preserve image details.
- Practice regularly.
- Review your work on multiple devices.
Consistency is one of the defining traits of professional editors.
Frequently Asked Questions
Which software is best for cinematic photo editing?
Adobe Lightroom and Adobe Photoshop are the most widely used tools, though Capture One, Luminar Neo, and Affinity Photo are also excellent options.
Can beginners learn cinematic photo editing?
Yes. By following a structured workflow and practicing consistently, beginners can create professional cinematic edits.
Why should I shoot in RAW format?
RAW files retain more image data, allowing greater flexibility when adjusting exposure, colors, and details.
What are the most popular cinematic color combinations?
Teal and orange, blue and gold, and green with brown are among the most popular cinematic color palettes.
How important is color grading?
Color grading is one of the most important steps because it establishes the mood, atmosphere, and storytelling of the image.
Should I use heavy filters?
No. Subtle, controlled adjustments produce a more natural and professional cinematic appearance.
How can I create more depth in my photos?
Use local adjustments, selective lighting, contrast, dodge and burn techniques, and careful subject isolation.
Is film grain necessary?
Film grain is optional but can add texture and a classic cinematic feel when used sparingly.
How long does it take to master cinematic editing?
With consistent practice and a solid workflow, noticeable improvements can be achieved within a few months, while mastery develops over continued experience.
Conclusion
Mastering Cinematic Photo Editing Step by Step is a valuable skill for photographers, designers, and content creators who want their images to stand out. By carefully adjusting exposure, white balance, contrast, color grading, local enhancements, sharpening, and finishing effects, you can transform ordinary photographs into visually compelling works of art.
