

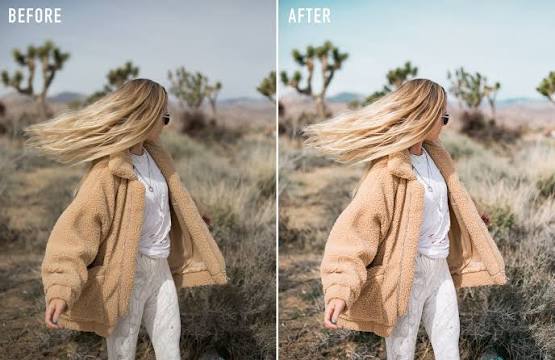
Photo editing step by step helps beginners transform ordinary pictures into attractive, professional-looking images. Modern editing tools make it easier to improve colors, adjust brightness, remove unwanted objects, and create beautiful visual results.
Learning photo editing takes creativity, patience, and a basic understanding of editing techniques. A structured approach helps beginners understand essential tools, improve image quality, and develop professional editing skills without unnecessary complications.
Understanding the Basics of Photo Editing
Photo editing involves improving digital images through different adjustments and creative techniques. These changes can include brightness correction, contrast adjustment, color enhancement, cropping, sharpening, and background modification.
Understanding basic editing concepts creates a strong foundation for beginners. Each editing tool serves a different purpose, making it important to learn how individual adjustments affect image quality and overall appearance.
Choosing the Right Photo Editing Software
Selecting suitable editing software represents an important first step in the photo editing process. Beginners can explore mobile apps or desktop programs based on their editing needs, experience, and available devices.
Popular editing applications provide different features for image enhancement and creative adjustments. Some applications focus on simple filters, while advanced programs offer detailed controls for professional photo manipulation and color correction.
Step One: Select a High-Quality Photograph
Choosing a suitable photograph creates the foundation for successful editing. Images with clear subjects, balanced lighting, and strong composition usually produce better results during editing.
Start with an original photograph containing useful visual details. Avoid heavily compressed images because excessive compression can reduce sharpness, remove important details, and limit editing flexibility.
Step Two: Import Your Photograph
After selecting an image, import it into your preferred editing application. Most editing programs let you open photos directly from device storage, camera folders, or supported image libraries.
Organize your photographs before you start editing. Keeping original images separate from edited versions helps prevent accidental file replacement and makes future adjustments easier.
Step Three: Crop and Straighten Your Image
Cropping removes unnecessary areas from a photograph and directs attention to the main subject. Proper cropping improves composition, removes distractions, and creates a more balanced visual arrangement.
Straightening corrects tilted horizons and uneven image angles. Small alignment adjustments can make landscapes, buildings, portraits, and everyday photographs appear cleaner and more professional.
Step Four: Adjust Brightness and Exposure
Brightness controls a photograph’s overall light appearance. Increasing brightness can reveal details in darker areas, while reducing brightness helps restore balance in lighter sections.
Exposure adjustments help control how much light appears throughout an image. Make gradual changes instead of applying extreme settings because excessive adjustments can remove important details and create unnatural results.
Step Five: Improve Contrast
Contrast describes the difference between lighter and darker areas within a photograph. Increasing contrast can make subjects appear more defined and create stronger visual separation between different elements.
Low contrast can make photographs look flat or faded. Adjusting contrast carefully improves depth, clarity, and visual interest without making shadows excessively dark or highlights unnecessarily bright.
Step Six: Correct White Balance
White balance controls a photograph’s overall color temperature. Incorrect settings can create unwanted yellow, blue, or orange tones that affect an image’s natural appearance.
Use temperature and tint controls to achieve more accurate colors. Natural-looking white balance helps skin tones, backgrounds, clothing, and other objects maintain realistic visual characteristics.
Step Seven: Enhance Colors and Saturation
Color enhancement gives photographs a more attractive, balanced look. Saturation controls color intensity, while vibrance boosts weaker colors without affecting every color equally.
Avoid excessive saturation because highly intense colors can make photographs appear artificial. Apply moderate adjustments to preserve natural tones and maintain a professional visual style.
Step Eight: Adjust Highlights and Shadows
Highlights represent brighter sections of an image, while shadows contain darker visual information. These controls help recover detail and improve overall lighting balance in photographs.
Reducing highlights can restore details in bright areas, while increasing shadows reveals information in darker sections. Balanced adjustments create a more complete image with improved depth and clarity.
Step Nine: Improve Image Sharpness
Sharpening enhances visible edges and makes important details appear clearer. This adjustment works particularly well for portraits, product photography, landscapes, and photographs containing detailed textures.
Apply sharpening gradually because excessive settings can create unwanted outlines and digital noise. A professional result should maintain natural textures without making the photograph appear overly processed.
Step Ten: Remove Unwanted Objects
Unwanted objects can distract viewers from a photograph’s main subject. Object removal tools help eliminate small distractions, background imperfections, dust marks, and unnecessary visual elements.
Healing and cloning tools offer different ways to correct image imperfections. Use these features carefully to keep backgrounds realistic and avoid noticeable editing marks.
Step Eleven: Edit Backgrounds Professionally
Background editing improves the overall look of portraits, product photos, and creative images. Removing distractions or adjusting background colors can make the main subject more noticeable.
Some editing applications provide automatic background selection and replacement features. Carefully check subject edges, hair details, and surrounding areas to achieve a natural-looking result.
Step Twelve: Retouch Portrait Photographs
Portrait retouching focuses on improving facial details while preserving natural skin texture. Basic adjustments can correct minor imperfections, improve lighting, and create a balanced appearance.
Avoid excessive smoothing because it removes natural skin details and creates artificial-looking results. Professional portrait editing focuses on subtle improvements rather than completely changing someone’s appearance.
Step Thirteen: Apply Creative Filters
Filters provide ready-made visual effects that change colors, contrast, brightness, and overall image atmosphere. They help beginners experiment with different creative styles without manually adjusting every setting.
Choose filters based on the photograph’s subject and intended look. Applying several strong effects together can reduce image quality, so keep adjustments consistent and visually balanced.
Step Fourteen: Use Selective Editing Tools
Selective editing allows users to modify specific areas without changing the entire photograph. Brush tools, radial adjustments, and gradient masks provide greater control over local brightness and color.
These features help emphasize important subjects and improve uneven lighting. Beginners should practice small adjustments to understand how selective editing affects different areas of an image.
Step Fifteen: Reduce Image Noise
Image noise appears as unwanted grain or colored speckles, especially in photographs taken in low light. Noise reduction tools help create smoother images and improve overall visual quality.
Apply noise reduction carefully because excessive smoothing can remove fine textures. Balance noise correction with sharpening to preserve important details and maintain a natural appearance.
Step Sixteen: Create a Professional Color Style
Color grading changes a photograph’s overall color atmosphere. Different color combinations can create warm, cool, cinematic, vintage, or modern visual styles.
Developing a consistent color style helps create recognizable editing results. Experiment with color temperature, shadows, highlights, and individual color channels to discover suitable combinations.
Step Seventeen: Check Your Final Adjustments
Review the edited photograph to catch mistakes before exporting the final image. Compare the original and edited versions to understand whether each adjustment improves the overall appearance.
Check brightness, color balance, sharpness, cropping, and background details. Remove unnecessary effects and correct any editing mistakes that affect image quality or visual consistency.
Step Eighteen: Save Your Edited Photograph
Saving your finished photograph represents the final stage of the editing process. Select an appropriate file format according to your intended use and image quality requirements.
JPEG works well for everyday sharing and smaller file sizes, while PNG supports lossless image storage and transparency. Keep an original copy to preserve editing flexibility for future projects.
Read Also: Wedding Photo Editing: A Complete Beginner’s Guide to Creating Stunning Wedding Photos
Best Photo Editing Techniques for Beginners
Learning essential techniques helps beginners achieve better results without complicated editing methods. Start with brightness, contrast, cropping, color correction, and sharpening before exploring advanced creative adjustments.
Practice each technique using different photographs and lighting conditions. Regular experimentation builds editing confidence and helps you better understand image composition, color, and visual balance.
Common Photo Editing Mistakes to Avoid
Beginners sometimes apply excessive filters, increase saturation unnecessarily, or use too much sharpening. These mistakes can make photographs appear artificial and reduce important image details.
Another common mistake involves editing without checking the original photograph. Comparing both versions helps maintain realistic results and prevents unnecessary changes that reduce the image’s natural appearance.
How to Develop Professional Photo Editing Skills
Professional editing skills develop through regular practice and a clear understanding of photographic techniques. Study lighting, color theory, composition, image resolution, and different editing tools to improve your creative abilities.
Experiment with different photography styles and editing methods. Reviewing previous projects helps identify weaknesses, recognize improvements, and develop a consistent approach to producing high-quality photographs.
Photo Editing Step by Step for Social Media
Social media photos need an attractive presentation and the right dimensions. Adjust brightness, improve colors, remove distractions, and maintain consistent visual styling to create engaging content.
Different platforms support different image formats and display dimensions. Check the final image before uploading to ensure important subjects remain visible and image quality stays consistent.
Photo Editing Step by Step for Product Photography
Product photography editing focuses on presenting products clearly and accurately. Adjust exposure, correct white balance, improve sharpness, and remove distracting background elements while preserving realistic product colors.
Consistent editing helps product collections maintain a professional appearance. Avoid changing important product characteristics because accurate colors and details help viewers understand the actual appearance of an item.
Photo Editing Step by Step for Portrait Photography
Portrait editing requires careful attention to lighting, skin tones, facial details, and background appearance. Small adjustments can improve photograph quality while maintaining the subject’s natural features.
Start with exposure correction and white balance before applying minor retouching. Finish with subtle sharpening and color adjustments to create balanced, realistic portrait photographs.
Photo Editing Step by Step for Landscape Photography
Landscape editing improves natural scenery by enhancing lighting, colors, contrast, and environmental details. Proper adjustments can make mountains, forests, oceans, and sunsets appear more visually engaging.
Avoid excessive color enhancement because unrealistic tones can reduce the natural beauty of landscapes. Maintain balanced highlights, detailed shadows, and accurate colors for professional-looking results.
Importance of Image Resolution and Quality
Image resolution determines how much visual detail a photograph contains. Higher-resolution images generally provide greater flexibility for cropping, printing, and detailed editing tasks.
Always consider the intended display size before exporting photographs. Selecting suitable dimensions and compression settings helps maintain image quality while managing file size effectively.
Mobile Photo Editing vs Desktop Photo Editing
Mobile photo editing offers convenience and quick access to essential editing tools. Smartphones allow users to crop images, adjust colors, apply filters, and share finished photographs without using a computer.
Desktop editing provides greater control through advanced software and larger workspaces. Desktop editing often supports detailed retouching, complex masking, professional color grading, and large photography projects.
Tips for Faster and Better Photo Editing
A consistent editing workflow saves time and improves the quality of finished photographs. Start with basic corrections, move to detailed adjustments, and apply creative effects only when needed.
Create separate folders for original images, edited photographs, and completed projects. Organizing files makes it easier to find images, compare edits, and maintain an efficient workflow.
Benefits of Learning Photo Editing
Learning photo editing improves visual creativity and provides useful digital skills. These abilities help photographers, content creators, students, designers, and business owners produce attractive visual content.
Photo editing knowledge also creates opportunities to explore creative projects and digital careers. Regular practice helps users understand professional techniques and develop confidence when working with different photography styles.
Frequently Asked Questions
What Is Photo Editing Step by Step?
Photo editing step by step involves improving photographs through organized adjustments. These include cropping, brightness correction, color enhancement, sharpening, retouching, and exporting the finished image.
How Can Beginners Learn Photo Editing?
Beginners can start by learning basic editing tools and practicing with different photographs. Understanding brightness, contrast, cropping, and color correction creates a strong foundation for advanced editing.
Which Tools Are Important for Photo Editing?
Important editing tools include cropping, exposure, contrast, saturation, white balance, sharpening, noise reduction, and healing brushes. These features help improve image quality and correct common photography problems.
Is Mobile Photo Editing Good for Beginners?
Mobile photo editing provides an accessible way to learn basic editing techniques. Many apps offer simple interfaces and useful features to improve photos without advanced technical knowledge.
How Can I Make My Photos Look Professional?
Use balanced lighting, accurate colors, natural skin tones, proper cropping, and moderate sharpening. Avoid excessive filters and unnecessary effects to maintain a clean, professional appearance.
What Is the Best Format for Saving Edited Photos?
JPEG works well for sharing photographs online because it provides smaller file sizes. PNG supports lossless storage, while TIFF is commonly used in professional imaging workflows.
Why Is Color Correction Important?
Color correction improves the accuracy and consistency of photograph colors. It helps correct unwanted color casts and creates a more natural appearance across different areas of an image.
How Can I Improve Photo Editing Skills?
Practice regularly, explore different editing tools, and experiment with various photography styles. Comparing original and edited images also helps you spot mistakes and improve your editing techniques.
Can I Edit Photos Without Professional Software?
Yes, many beginner-friendly applications provide essential editing features. Many mobile and desktop programs offer basic tools for cropping, brightness, contrast, color adjustment, and sharpening.
How Long Does It Take to Learn Photo Editing?
Learning basic photo editing may take a few days of regular practice. Developing advanced techniques requires more experience, experimentation, and an understanding of photography principles.
Conclusion
Photo editing step by step gives beginners a practical way to turn ordinary photographs into attractive visual creations. Learning basic adjustments before exploring advanced techniques makes the entire process easier and more effective.
Start with simple corrections, practice regularly, and experiment with different editing styles. With patience and creativity, anyone can develop useful photo editing skills and produce clear, balanced, and professional-looking photographs.
